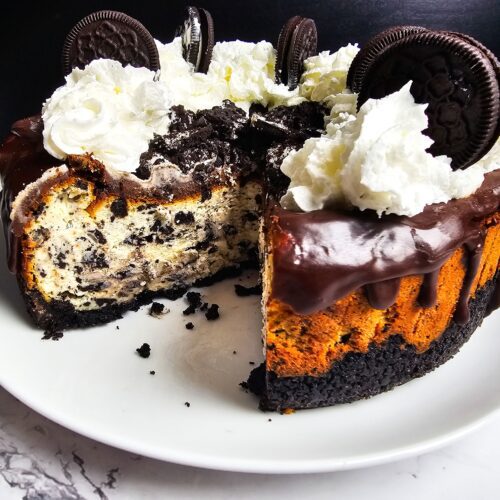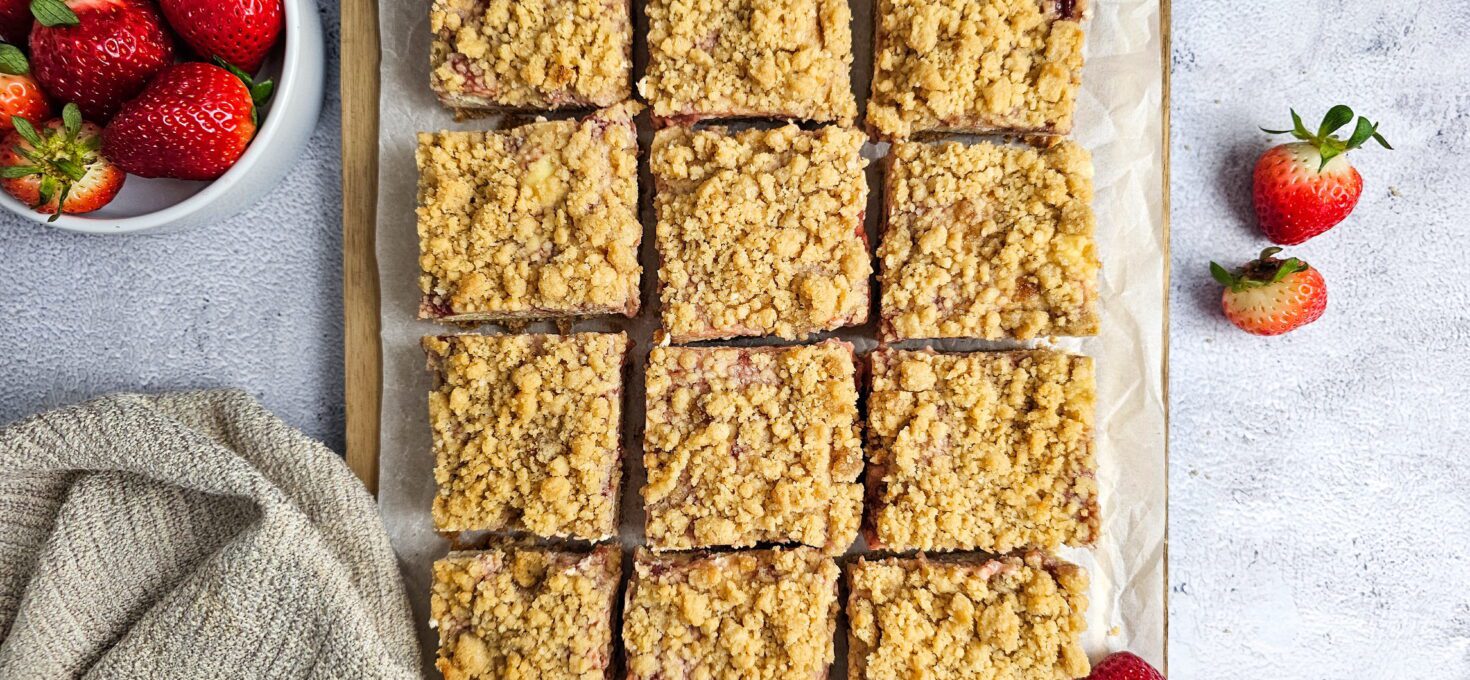
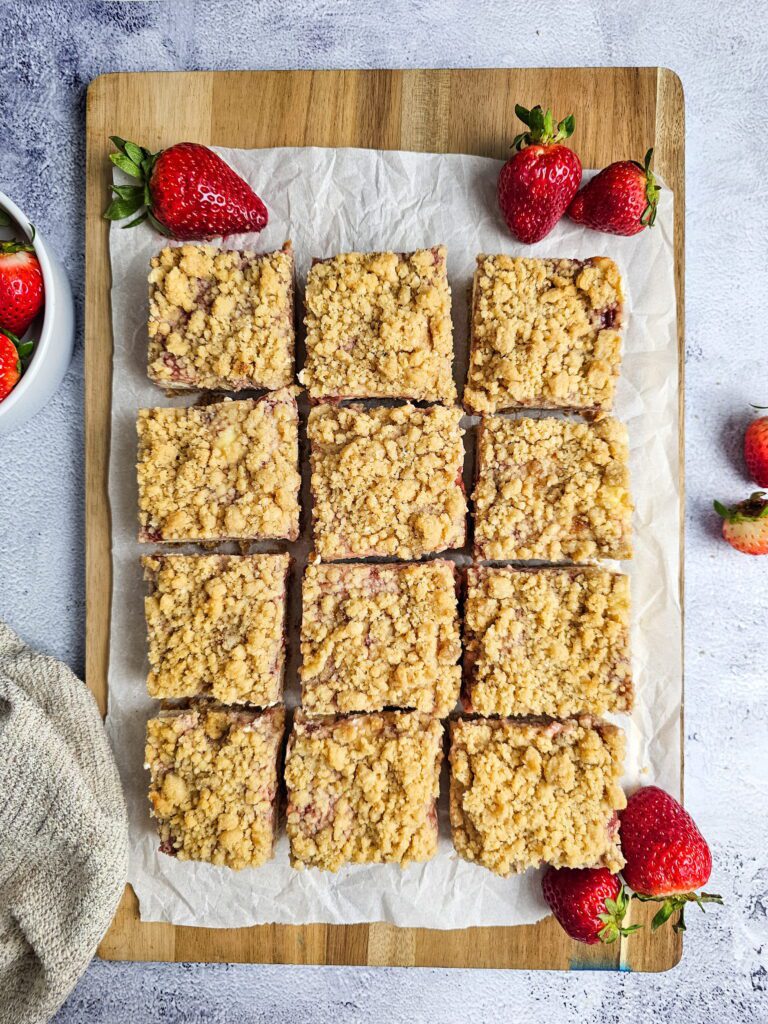
These strawberry cheesecake bars are made in a 9×13 pan with a thick buttery graham cracker crust, a creamy four-ingredient cheesecake filling, a homemade strawberry swirl made from frozen strawberries, and a brown sugar crumble topping that sets them apart from every other bar recipe out there. They bake at 325°F for 40–45 minutes and need at least 4 hours in the refrigerator before slicing. The crumble topping is what makes this version different — no other strawberry cheesecake bar recipe includes it.
Introduction
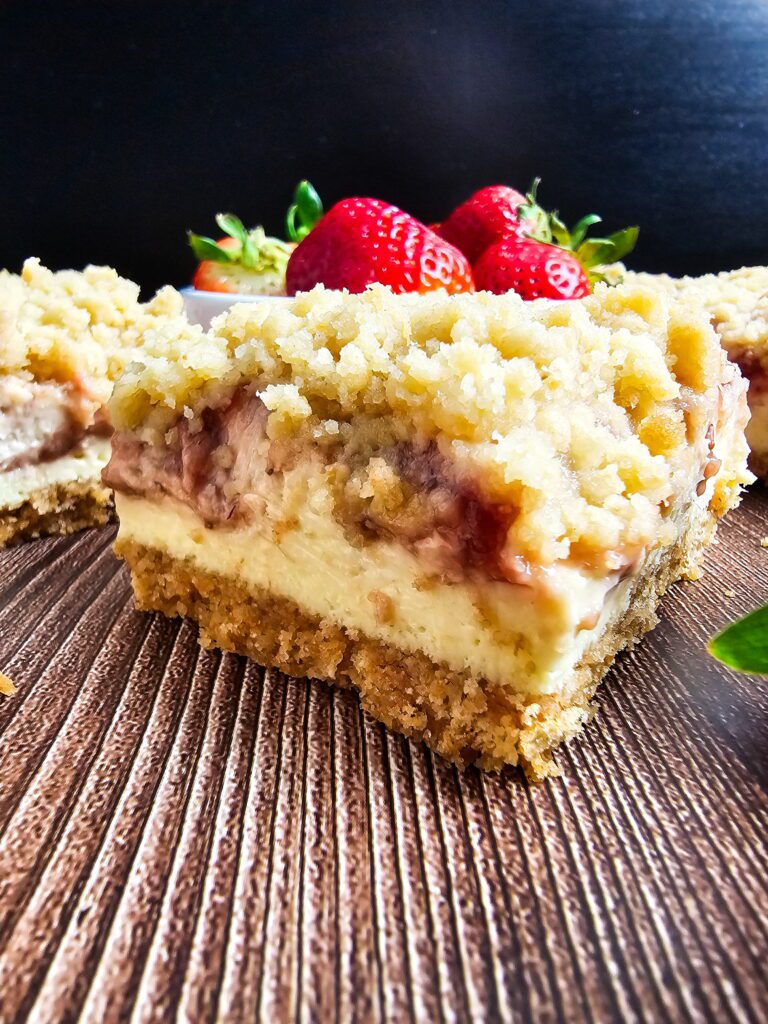
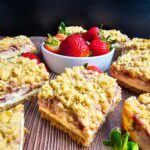
These strawberry cheesecake bars have a thick buttery graham cracker crust, a rich and creamy cheesecake filling, a jammy homemade strawberry swirl made from frozen strawberries, and a brown sugar crumble topping baked right on top. That last layer is what makes this recipe different from everything else out there — most strawberry cheesecake bars stop at the swirl. This one keeps going.
The filling is straightforward: four blocks of cream cheese, eggs, sugar, vanilla, and salt. No sour cream, no water bath, no springform pan. The strawberry sauce comes together on the stovetop in about 10 minutes using frozen strawberries straight from the bag — no thawing required. The crumble topping bakes up golden and sandy, adding texture and contrast to every bite.
I’ve made this for potlucks, summer cookouts, holiday trays, and Tuesday nights when the craving hit hard. It feeds a crowd, slices cleanly after a full overnight chill, and holds up well in the refrigerator for days. This is the strawberry cheesecake bar recipe I come back to every single time.
Why These Strawberry Cheesecake Bars Work
Most strawberry cheesecake bar recipes are essentially just cheesecake in a pan with jam dropped on top. They’re fine. But fine isn’t the goal here.
- The thick crust is the foundation. At 2½ cups of crumbs with 10 tablespoons of butter, this is a crust you can actually taste and feel under each bar. It holds its shape when sliced and doesn’t crumble apart the way thinner crusts do. Pressing it firmly with a flat glass and pre-baking it for 10 minutes are both steps that matter — they compact the crumbs and set the butter so the crust doesn’t absorb moisture from the filling above it.
- The homemade strawberry sauce is better than jam in every way. Cooking frozen strawberries down with sugar, lemon juice, and a cornstarch slurry gives you a thick, jammy sauce with real fruit flavor and a brilliant red color. It’s concentrated, not watery, and it swirls beautifully rather than sinking to the bottom.
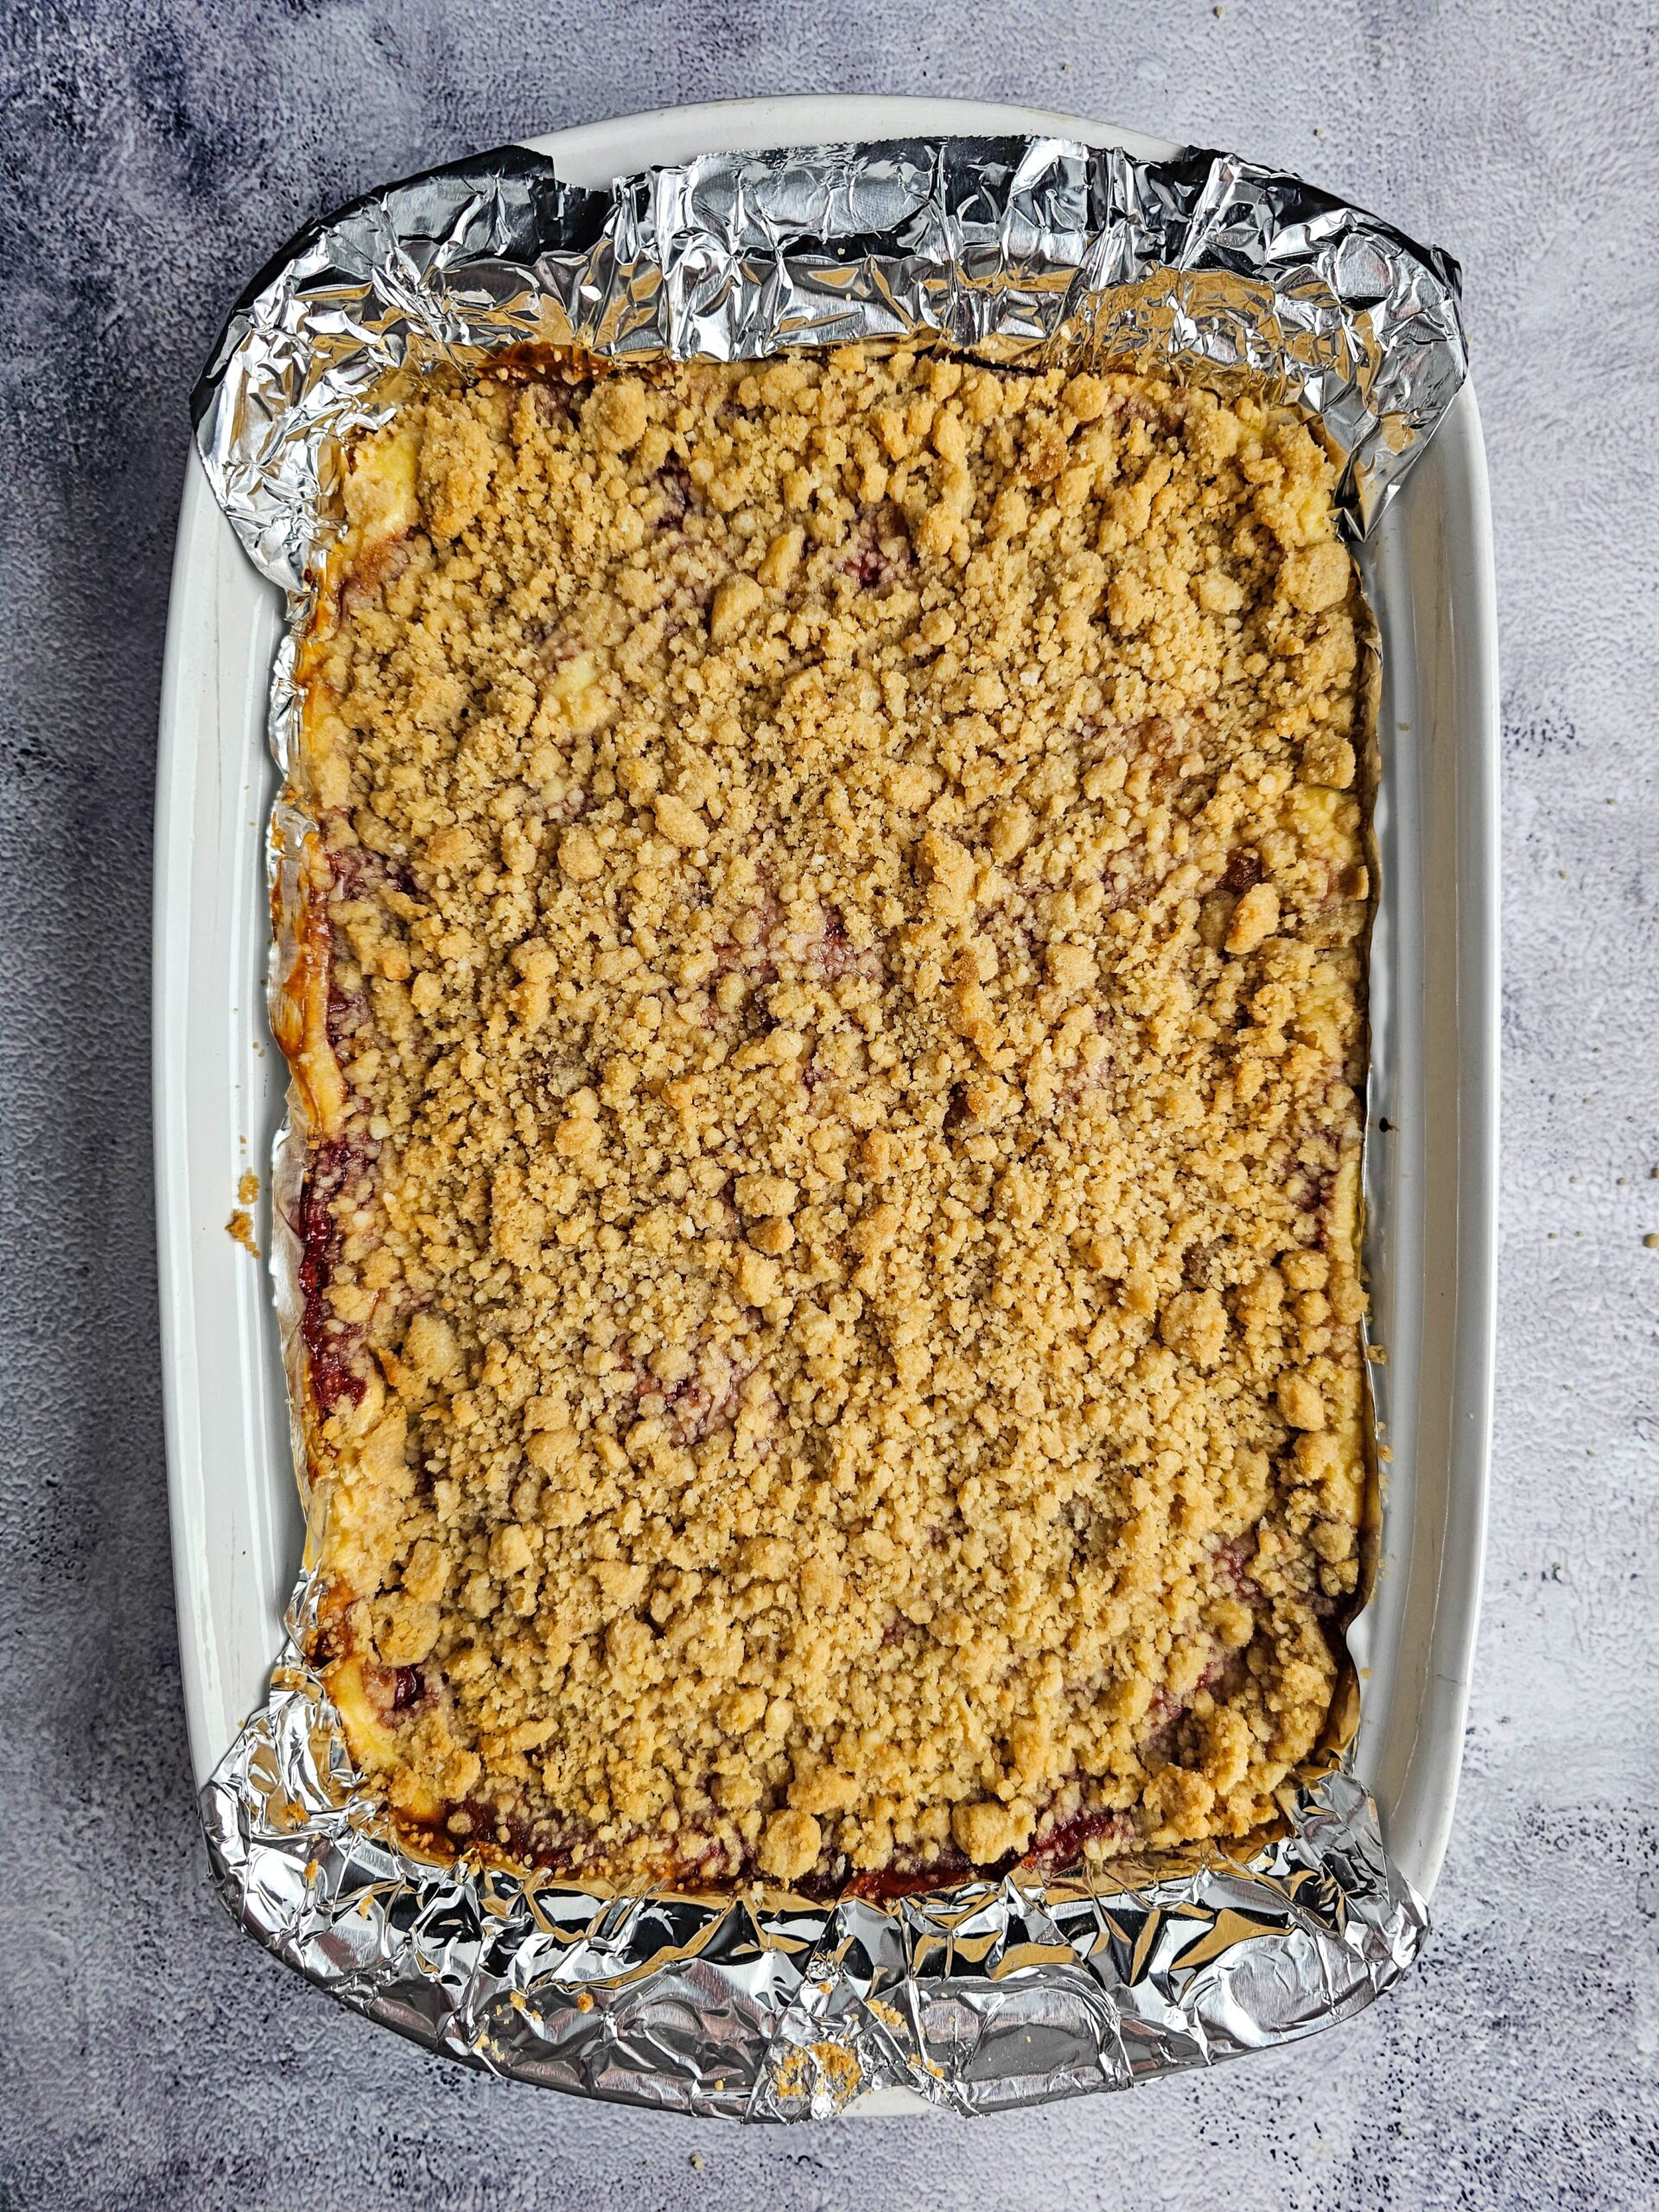
- The crumble topping is the move nobody else makes. Flour, brown sugar, salt, and melted butter pressed into crumbles and scattered over the top before baking — it adds a buttery, slightly crunchy layer that turns these bars into something closer to a strawberry crumble cheesecake hybrid. The contrast between the creamy filling, the soft swirl, and that sandy top is what people keep talking about.
- The overnight chill isn’t optional. It’s the difference between bars that fall apart and bars that hold a clean edge when you cut them.
Strawberry Cheesecake Bar Ingredients
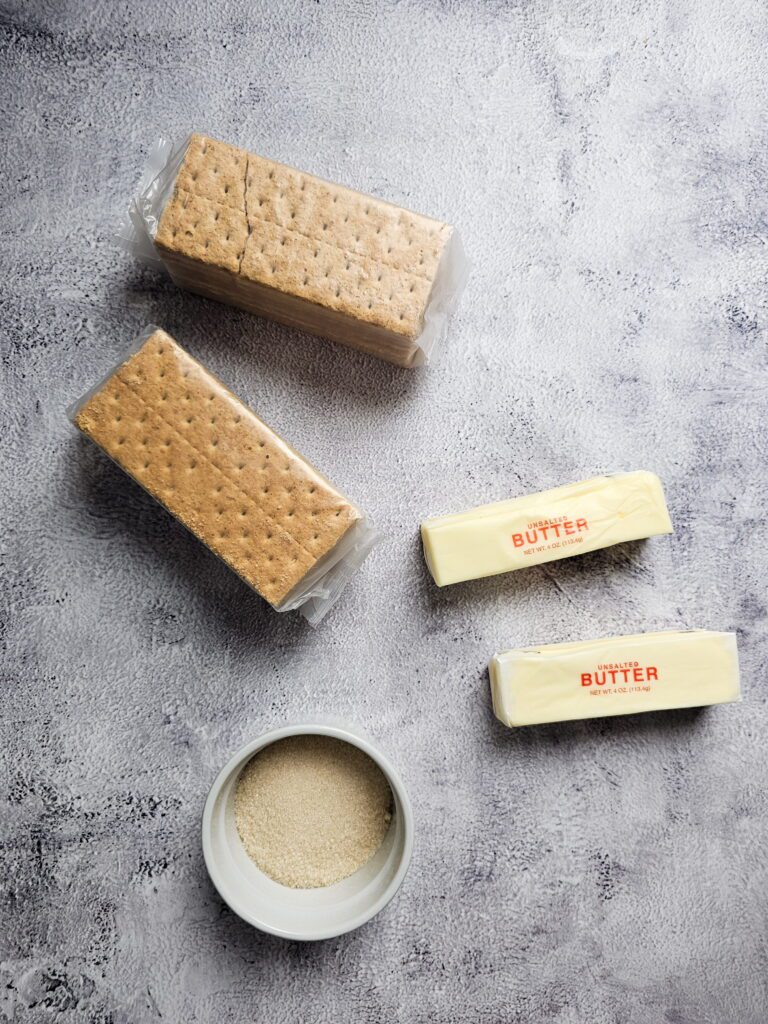
graham cracker crust:
- 2½ cups (210g) graham cracker crumbs, about 18–20 full sheets
- 10 tablespoons unsalted butter, melted
- ⅓ cup (67g) granulated sugar
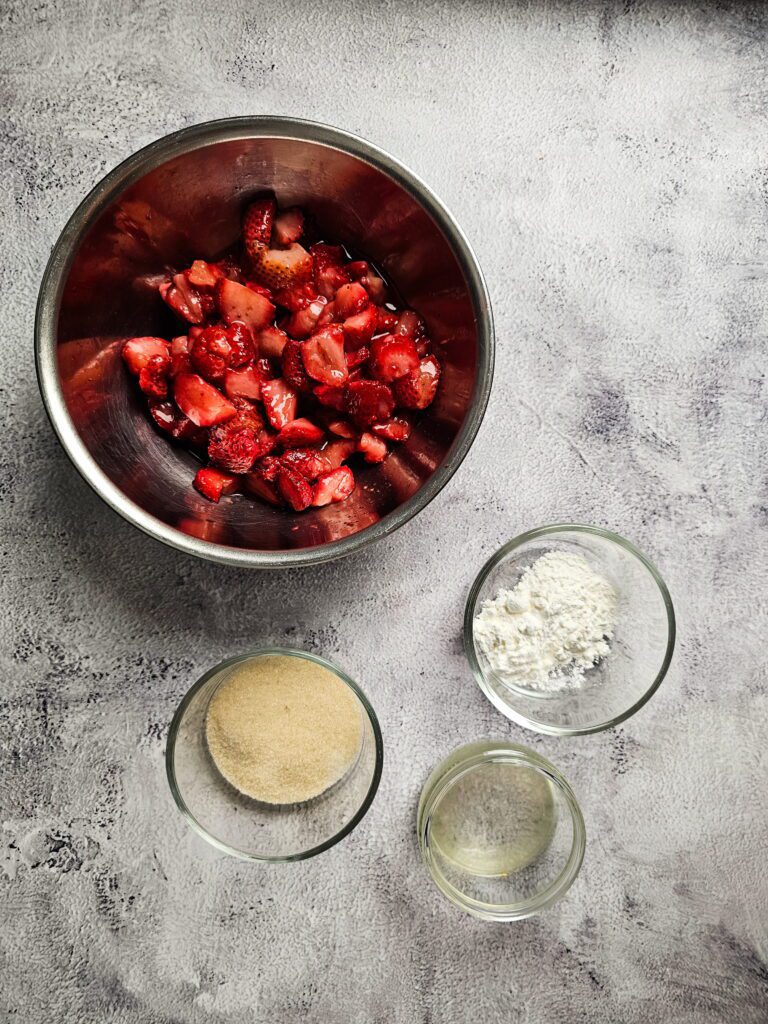
strawberry swirl:
- 2 cups frozen strawberries (no need to thaw)
- ¼ cup (50g) granulated sugar
- 1 tablespoon lemon juice
- 1 teaspoon cornstarch mixed with 1 tablespoon water
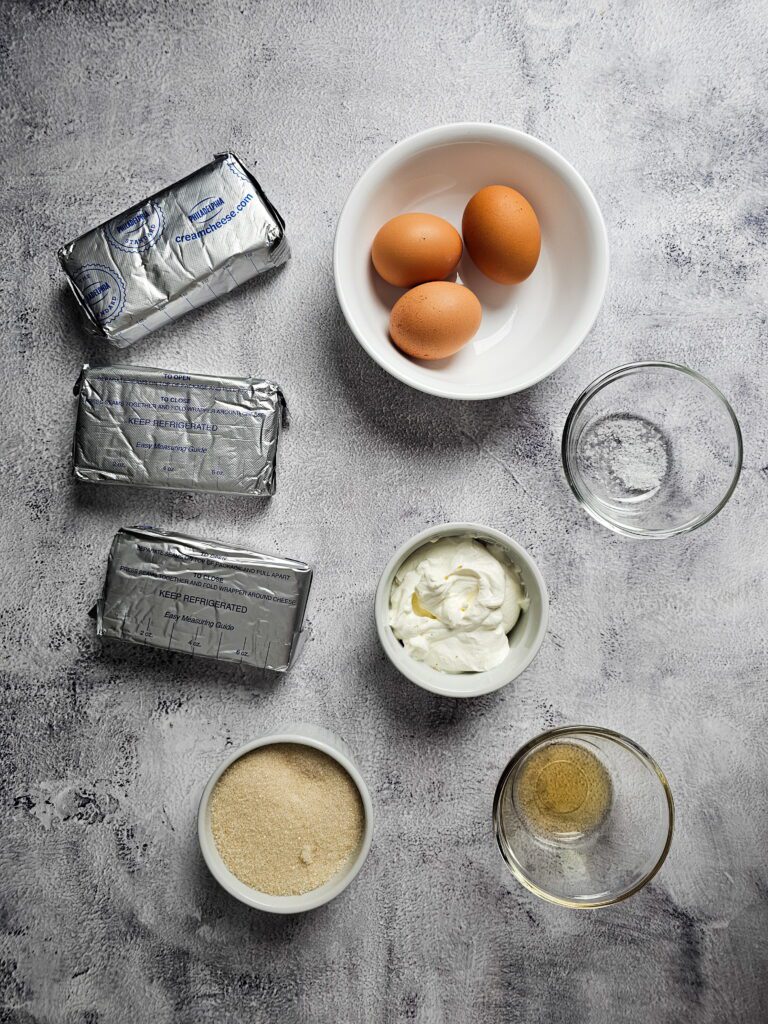
cheesecake filling:
- 4 packages (8 oz each) cream cheese, room temperature
- 4 large eggs, room temperature
- ¾ cup (150g) granulated sugar
- 2 teaspoons vanilla extract
- ½ teaspoon kosher salt
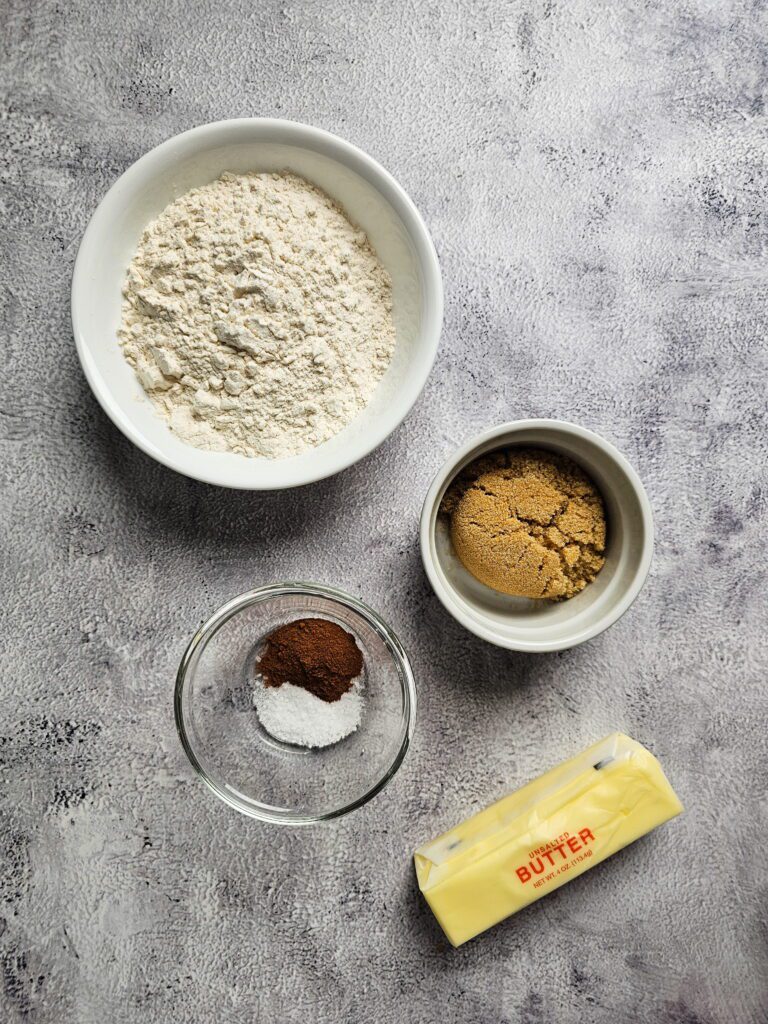
crumble topping:
- 1¼ cups (156g) all-purpose flour
- ½ cup (100g) light brown sugar, packed
- ½ teaspoon kosher salt
- 8 tablespoons (1 stick) unsalted butter, melted
How to Make Strawberry Cheesecake Bars
Time needed: 1 hour
- Prepare the pan:
Preheat your oven to 325°F (163°C). Line a 9×13-inch baking dish with parchment paper and leave enough overhang on both sides to use as handles when lifting the bars out later. Lightly grease the parchment.
- Make the strawberry swirl:
In a medium saucepan, combine the frozen strawberries, sugar, and lemon juice. Cook over medium heat, stirring occasionally, until the berries break down and release their juice — about 8–10 minutes. Stir in the cornstarch slurry and cook another 1–2 minutes until the sauce thickens noticeably. At this point you can blend it slightly for a smoother sauce or leave it a bit chunky for more texture. Transfer to a bowl and let it cool completely before using. This step can be done an hour ahead or even the day before.

- Make the crust.
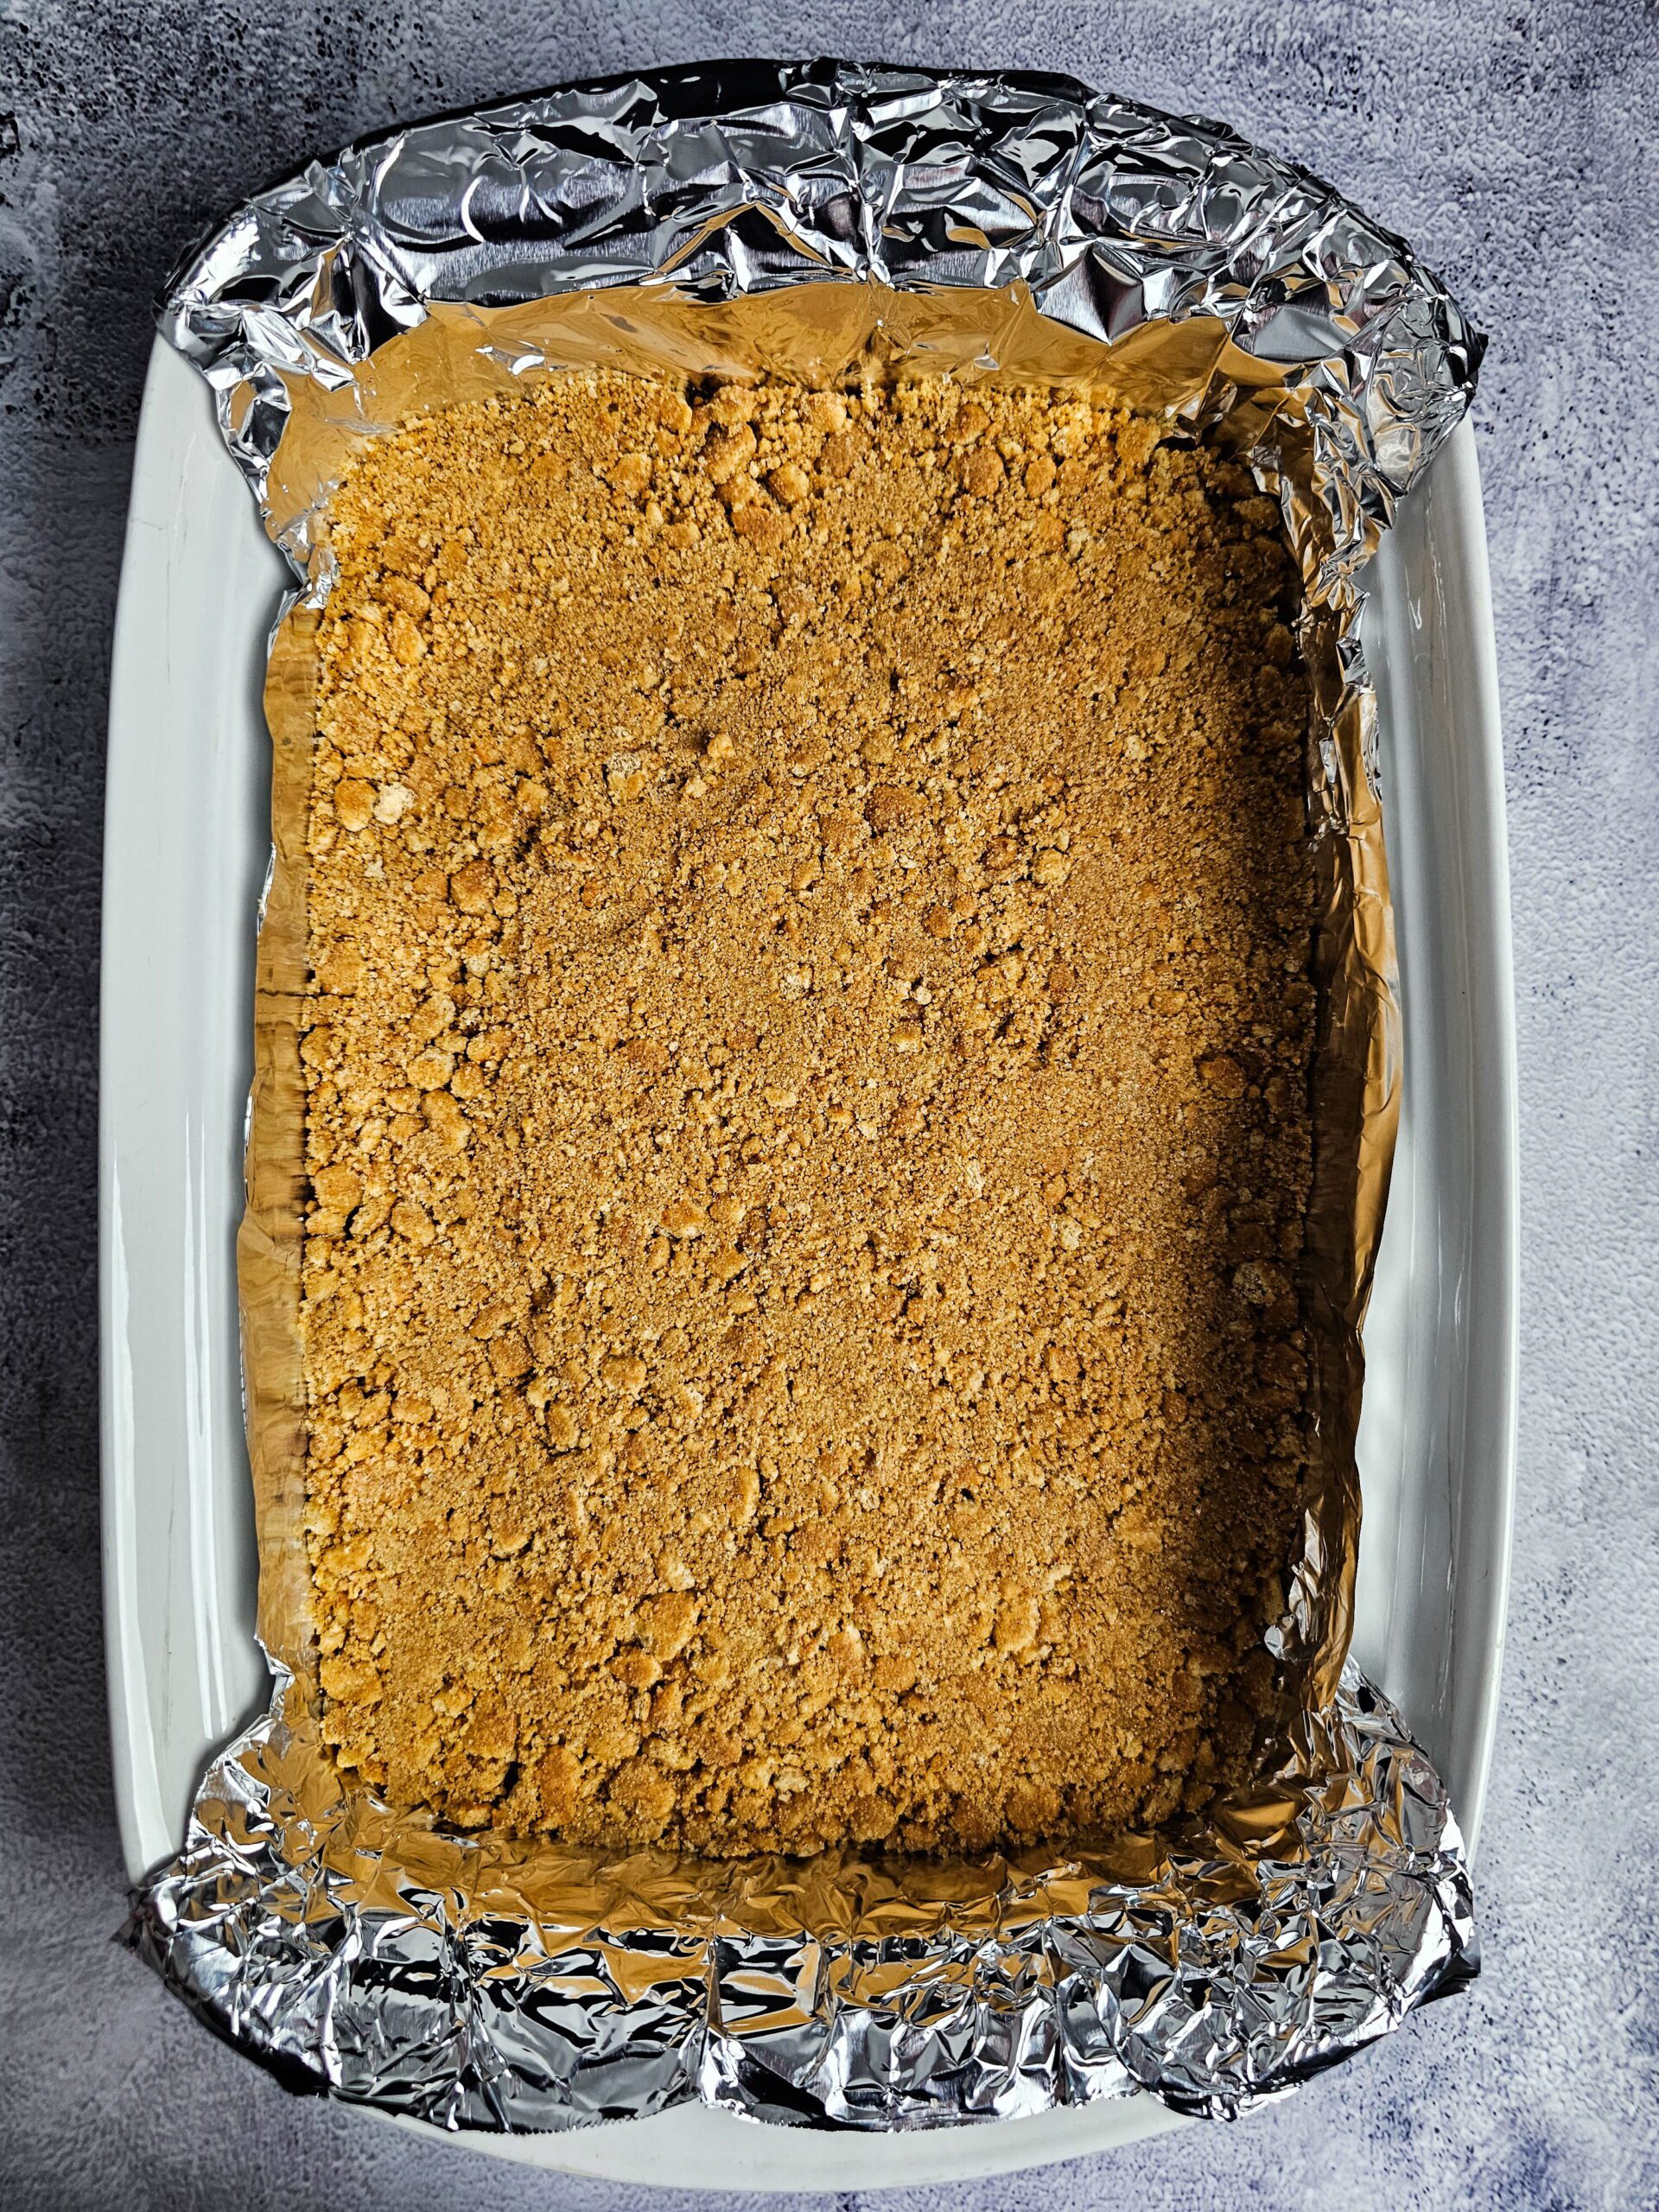
In a large bowl, mix the graham cracker crumbs, melted butter, and sugar until the mixture looks like wet sand and holds together when squeezed. Pour it into the prepared pan and press it into an even layer using your hands first, then compact it firmly with the flat bottom of a measuring cup or drinking glass. Get the edges tight. Bake for 10 minutes, then set aside to cool slightly while you make the filling.
- Make the cheesecake filling:
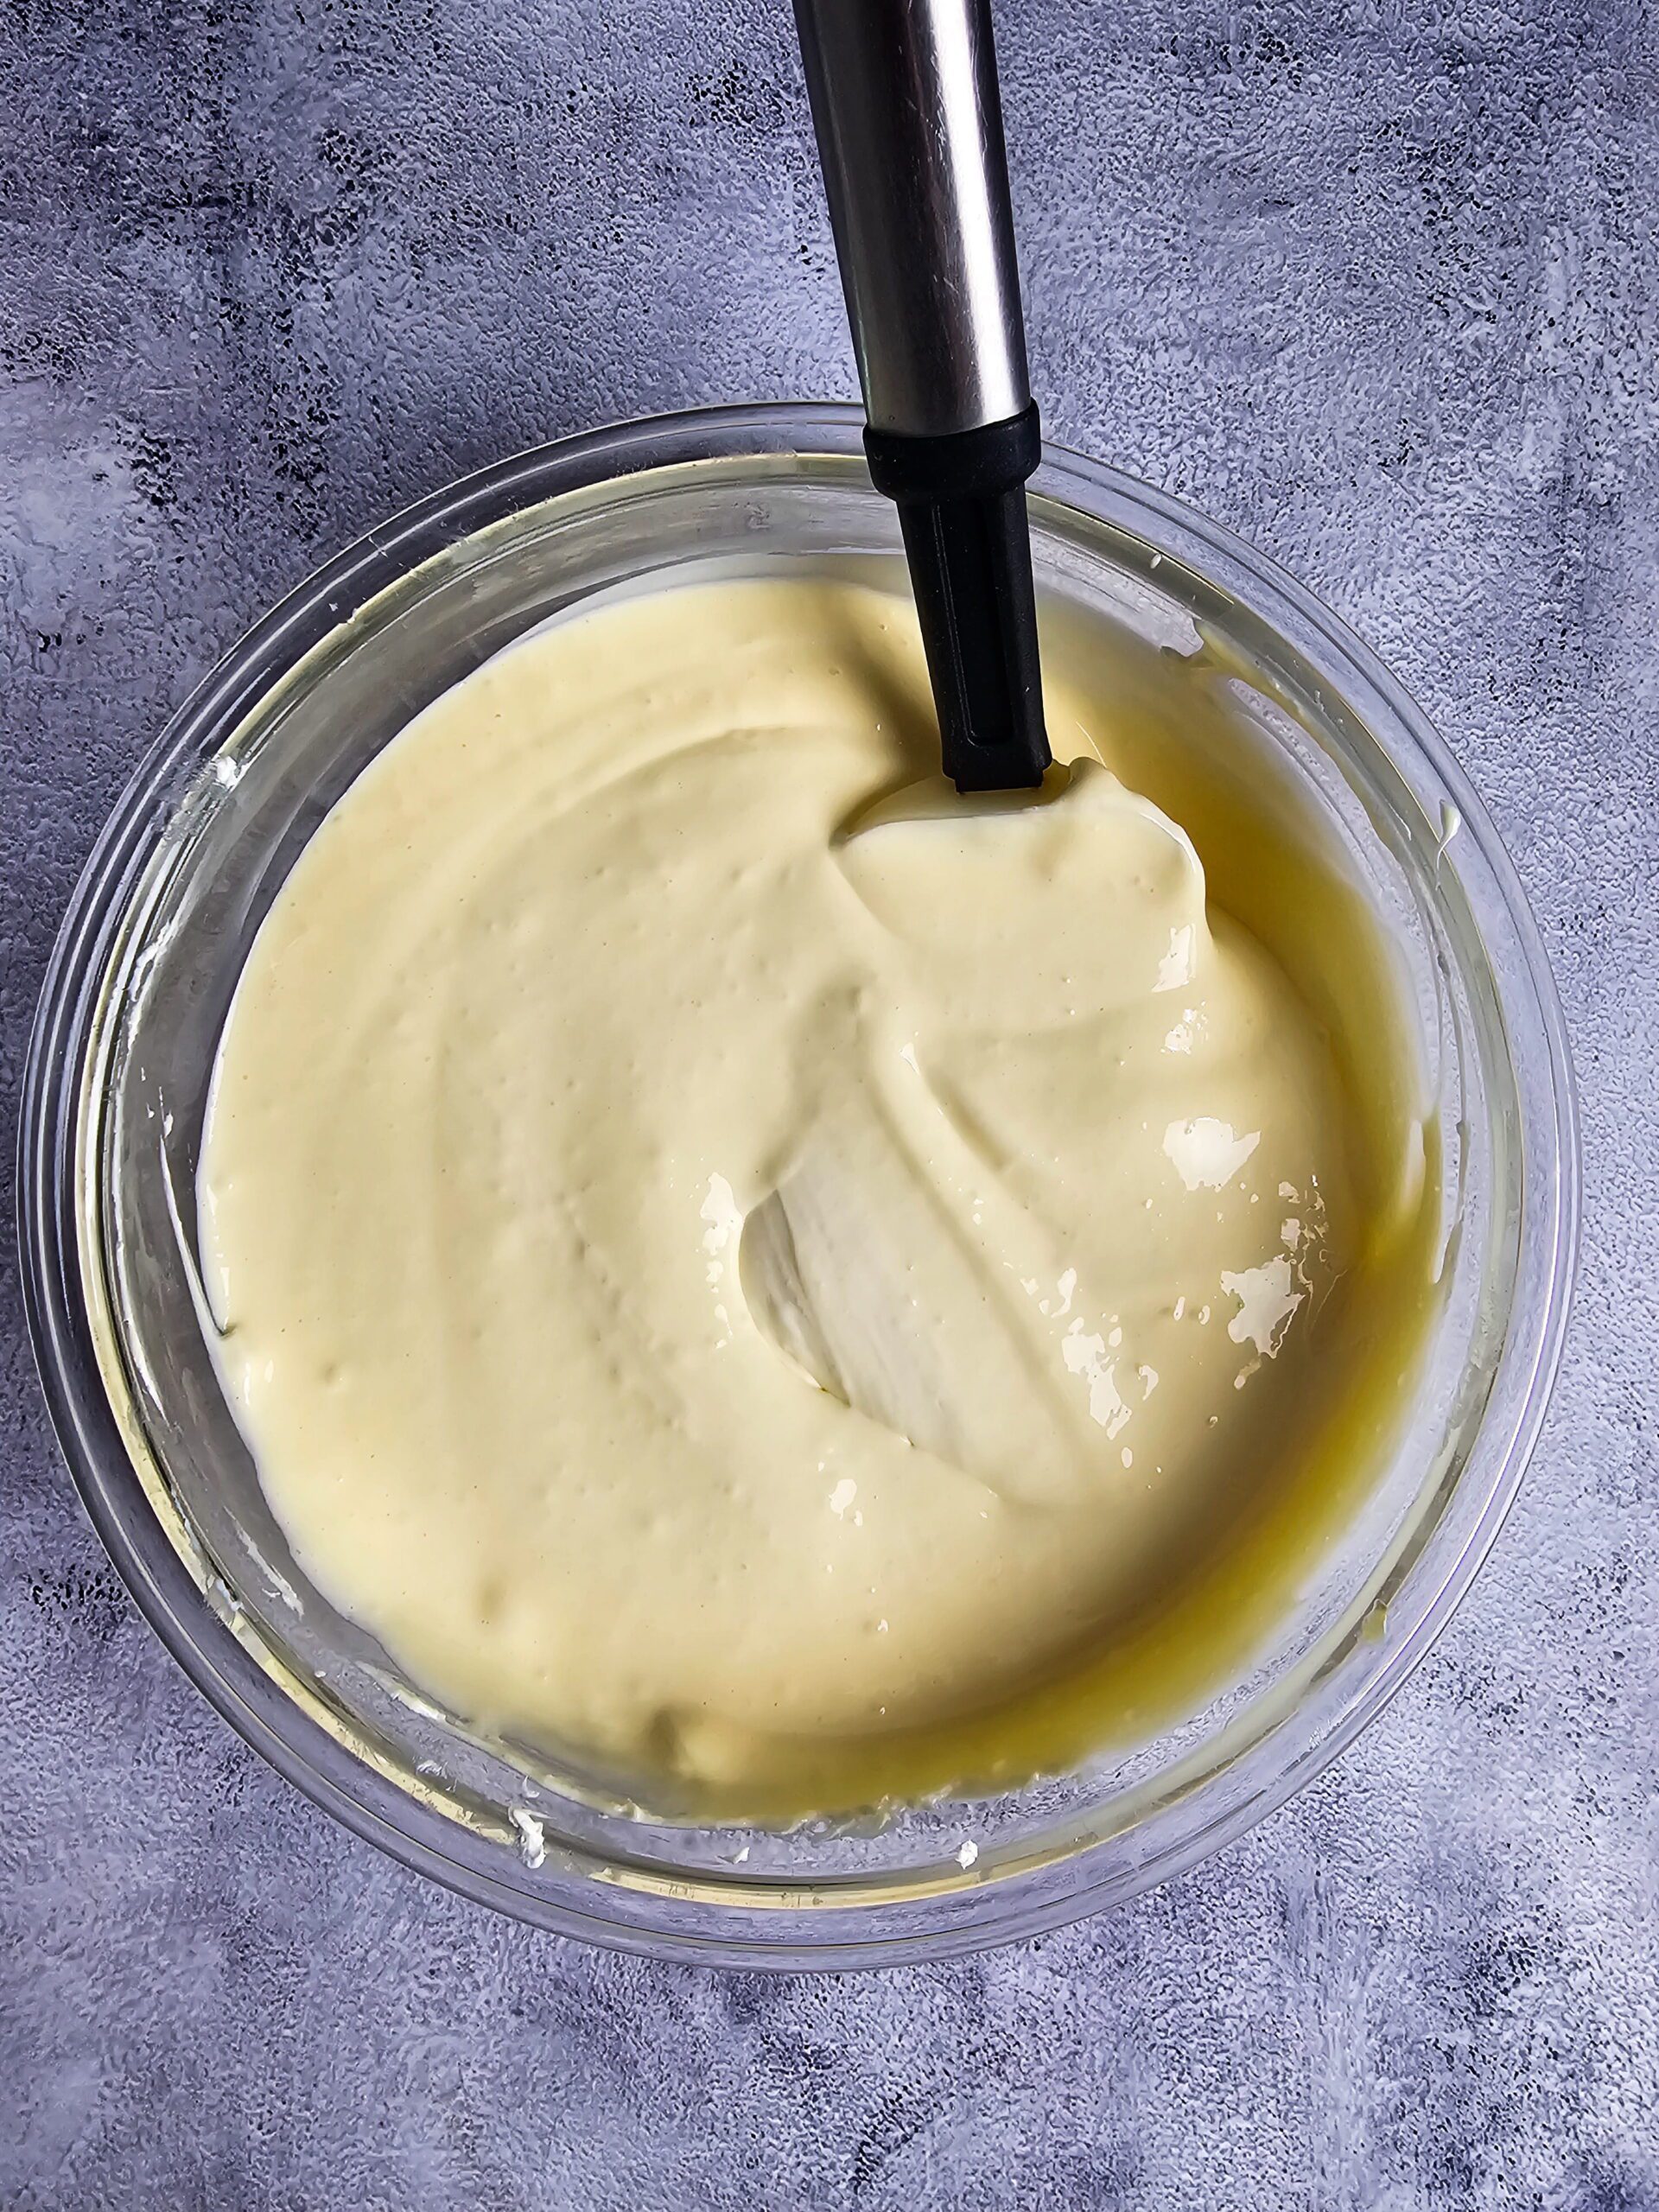
Beat the room temperature cream cheese with an electric mixer on medium speed until completely smooth, about 2 minutes. Scrape the bowl down. Add the sugar and beat until fully incorporated. Add the eggs one at a time, mixing on low speed after each one — low speed is important here because you don’t want to whip air into the batter, which can cause cracking. Mix in the vanilla and salt. Stop as soon as everything is combined.
- Assemble:
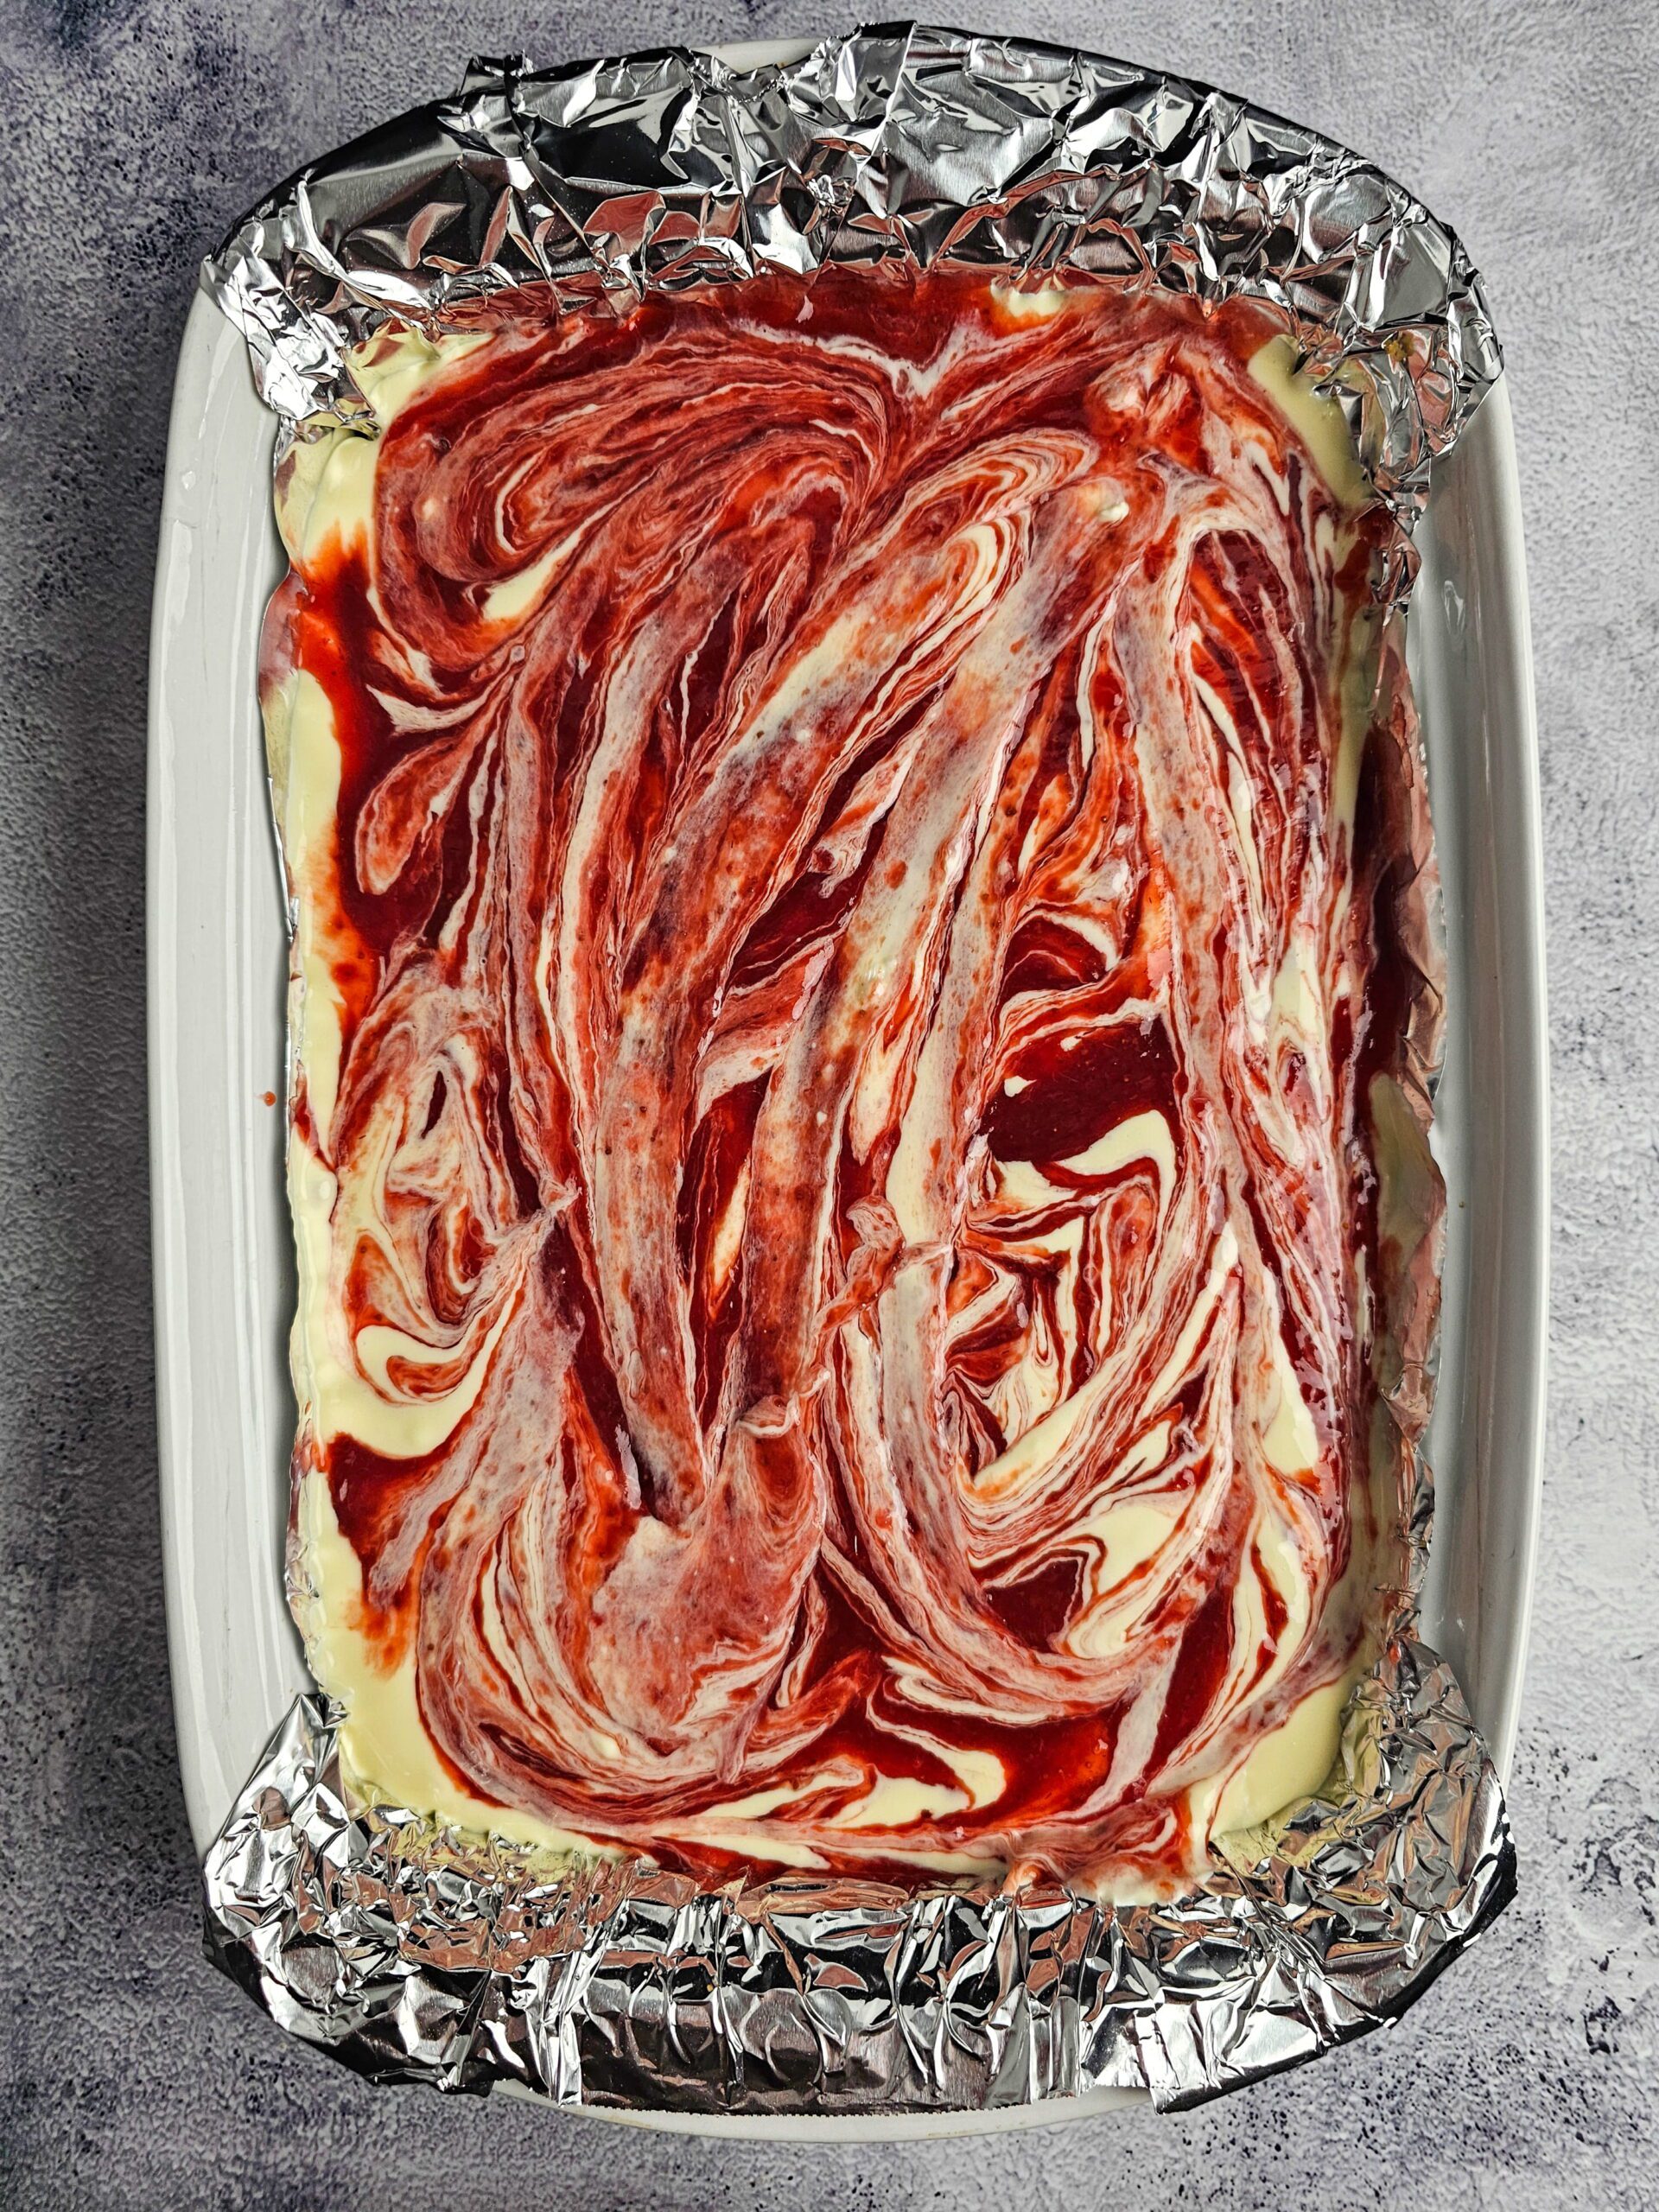
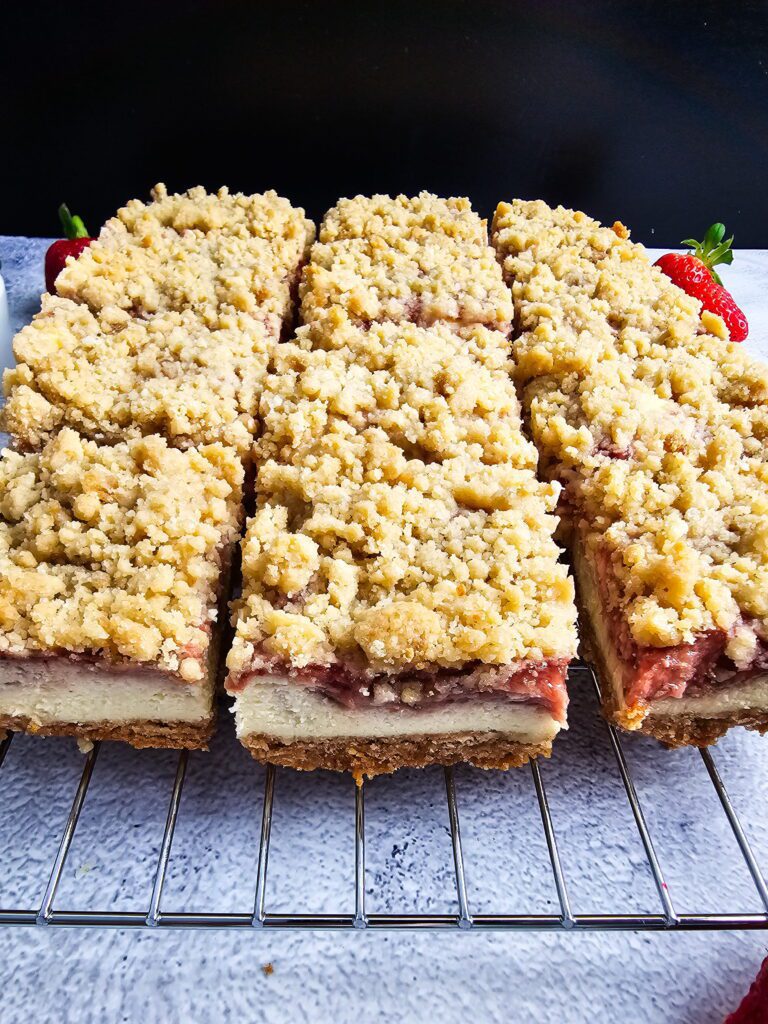
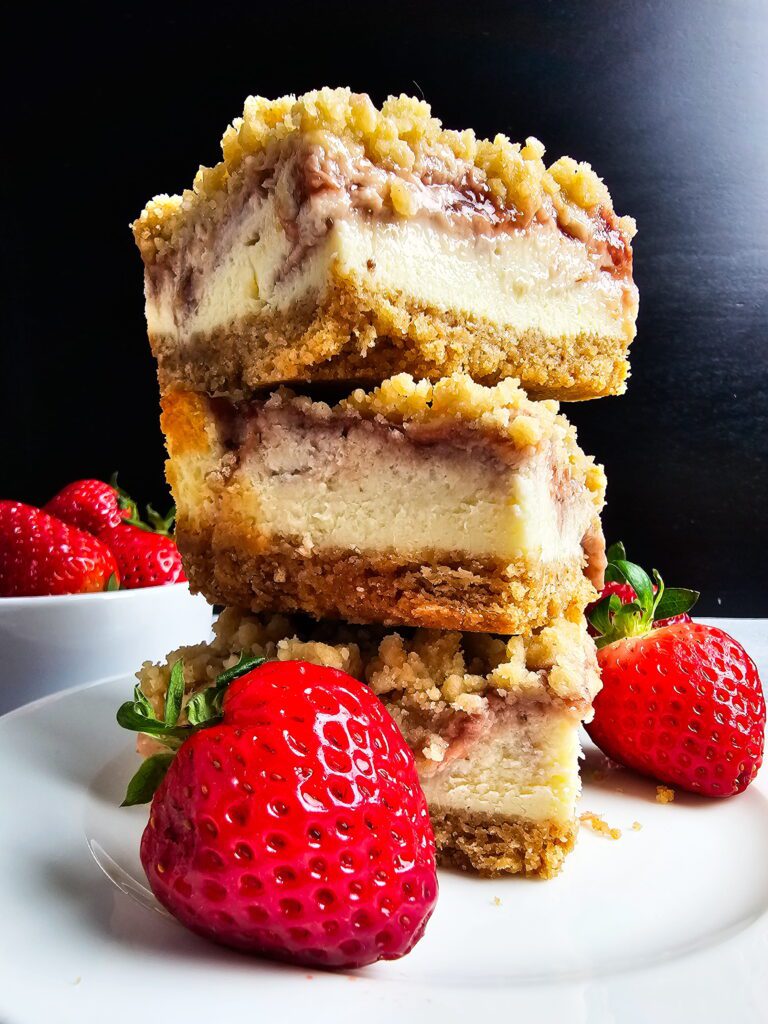
Pour the cheesecake filling evenly over the slightly cooled crust and spread it to the edges with a spatula. Drop spoonfuls of the cooled strawberry sauce across the top — aim for about 20 small dollops spread evenly rather than a few big ones. Use a butter knife or skewer to gently swirl: drag it through in slow S-curves without going all the way to the bottom. You want defined ribbons of strawberry, not a pink filling. Less swirling gives you better visual definition.
- Make and add the crumble:
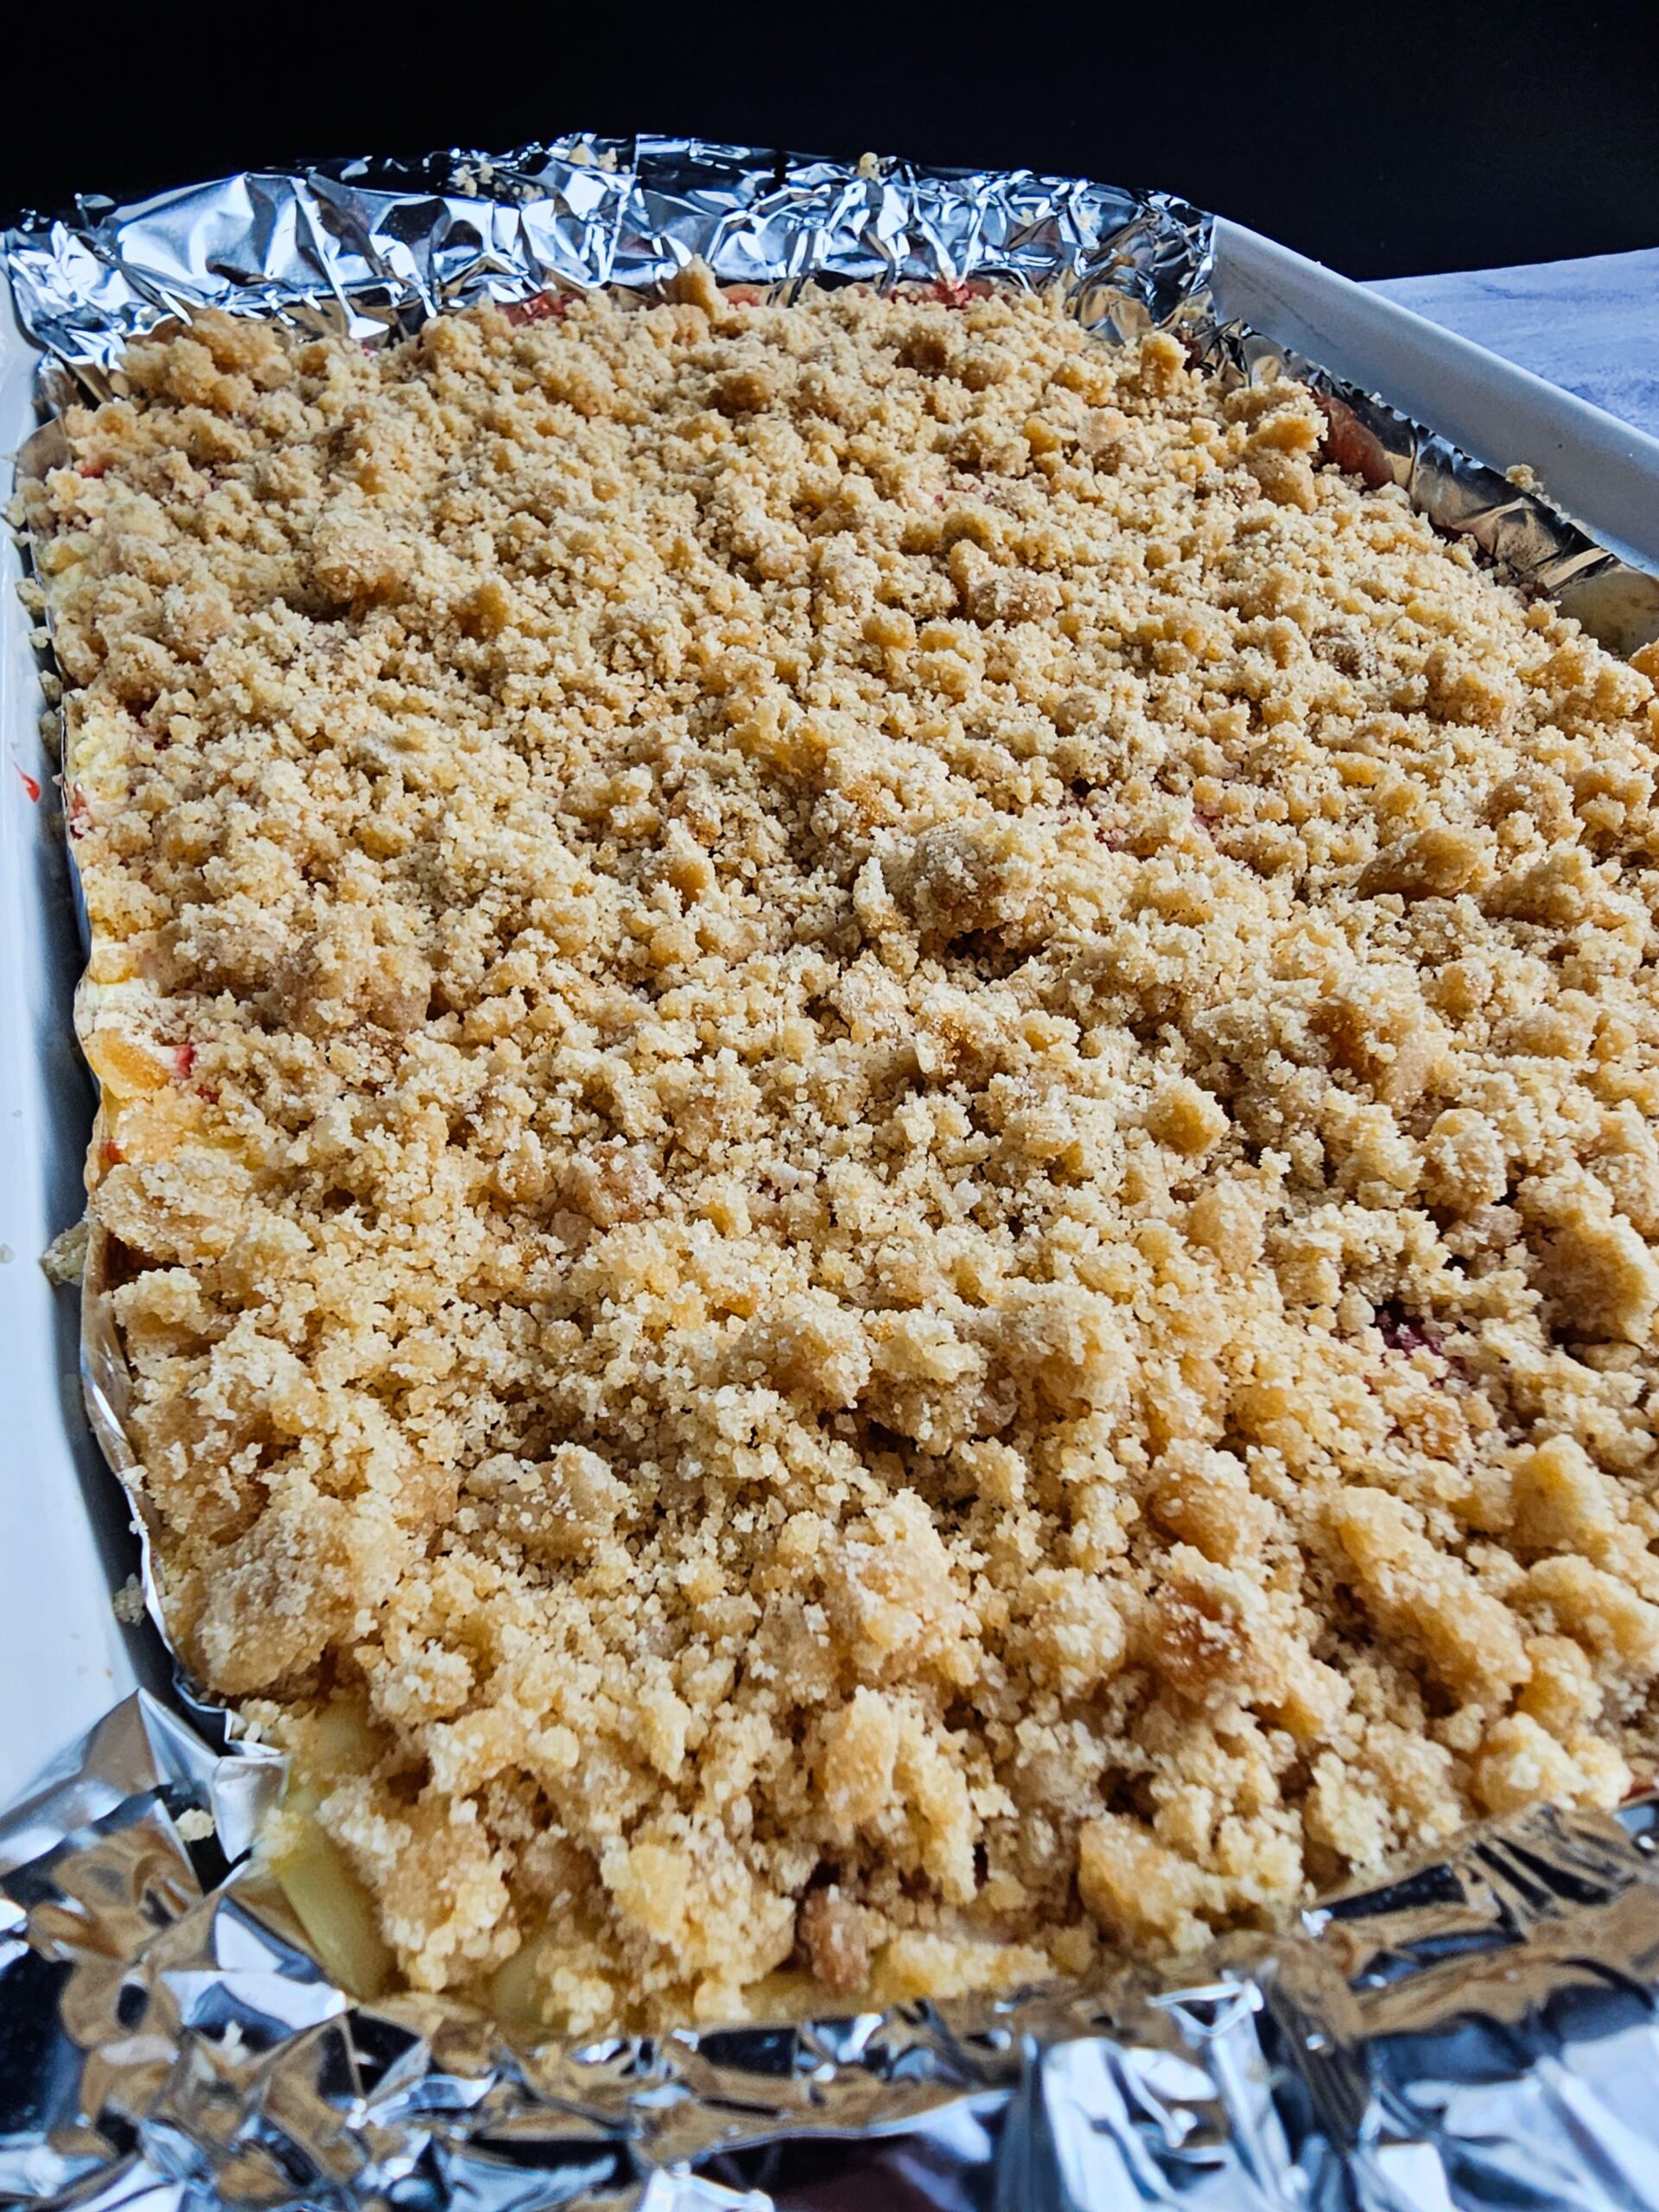
In a bowl, whisk together the flour, brown sugar, and salt. Pour in the melted butter and stir until the mixture forms clumpy, uneven crumbles — some larger, some smaller. Don’t overwork it or it’ll turn into a paste. Sprinkle the crumble evenly over the top of the assembled bars. Don’t press it in.
- Bake:
Bake uncovered at 325°F for 40–45 minutes. The center should be just set and have a slight jiggle when you gently shake the pan — it will firm up fully as it chills. The crumble on top should be golden. If the crumble is browning too fast before the center sets, loosely tent with foil.
- Chill and slice:
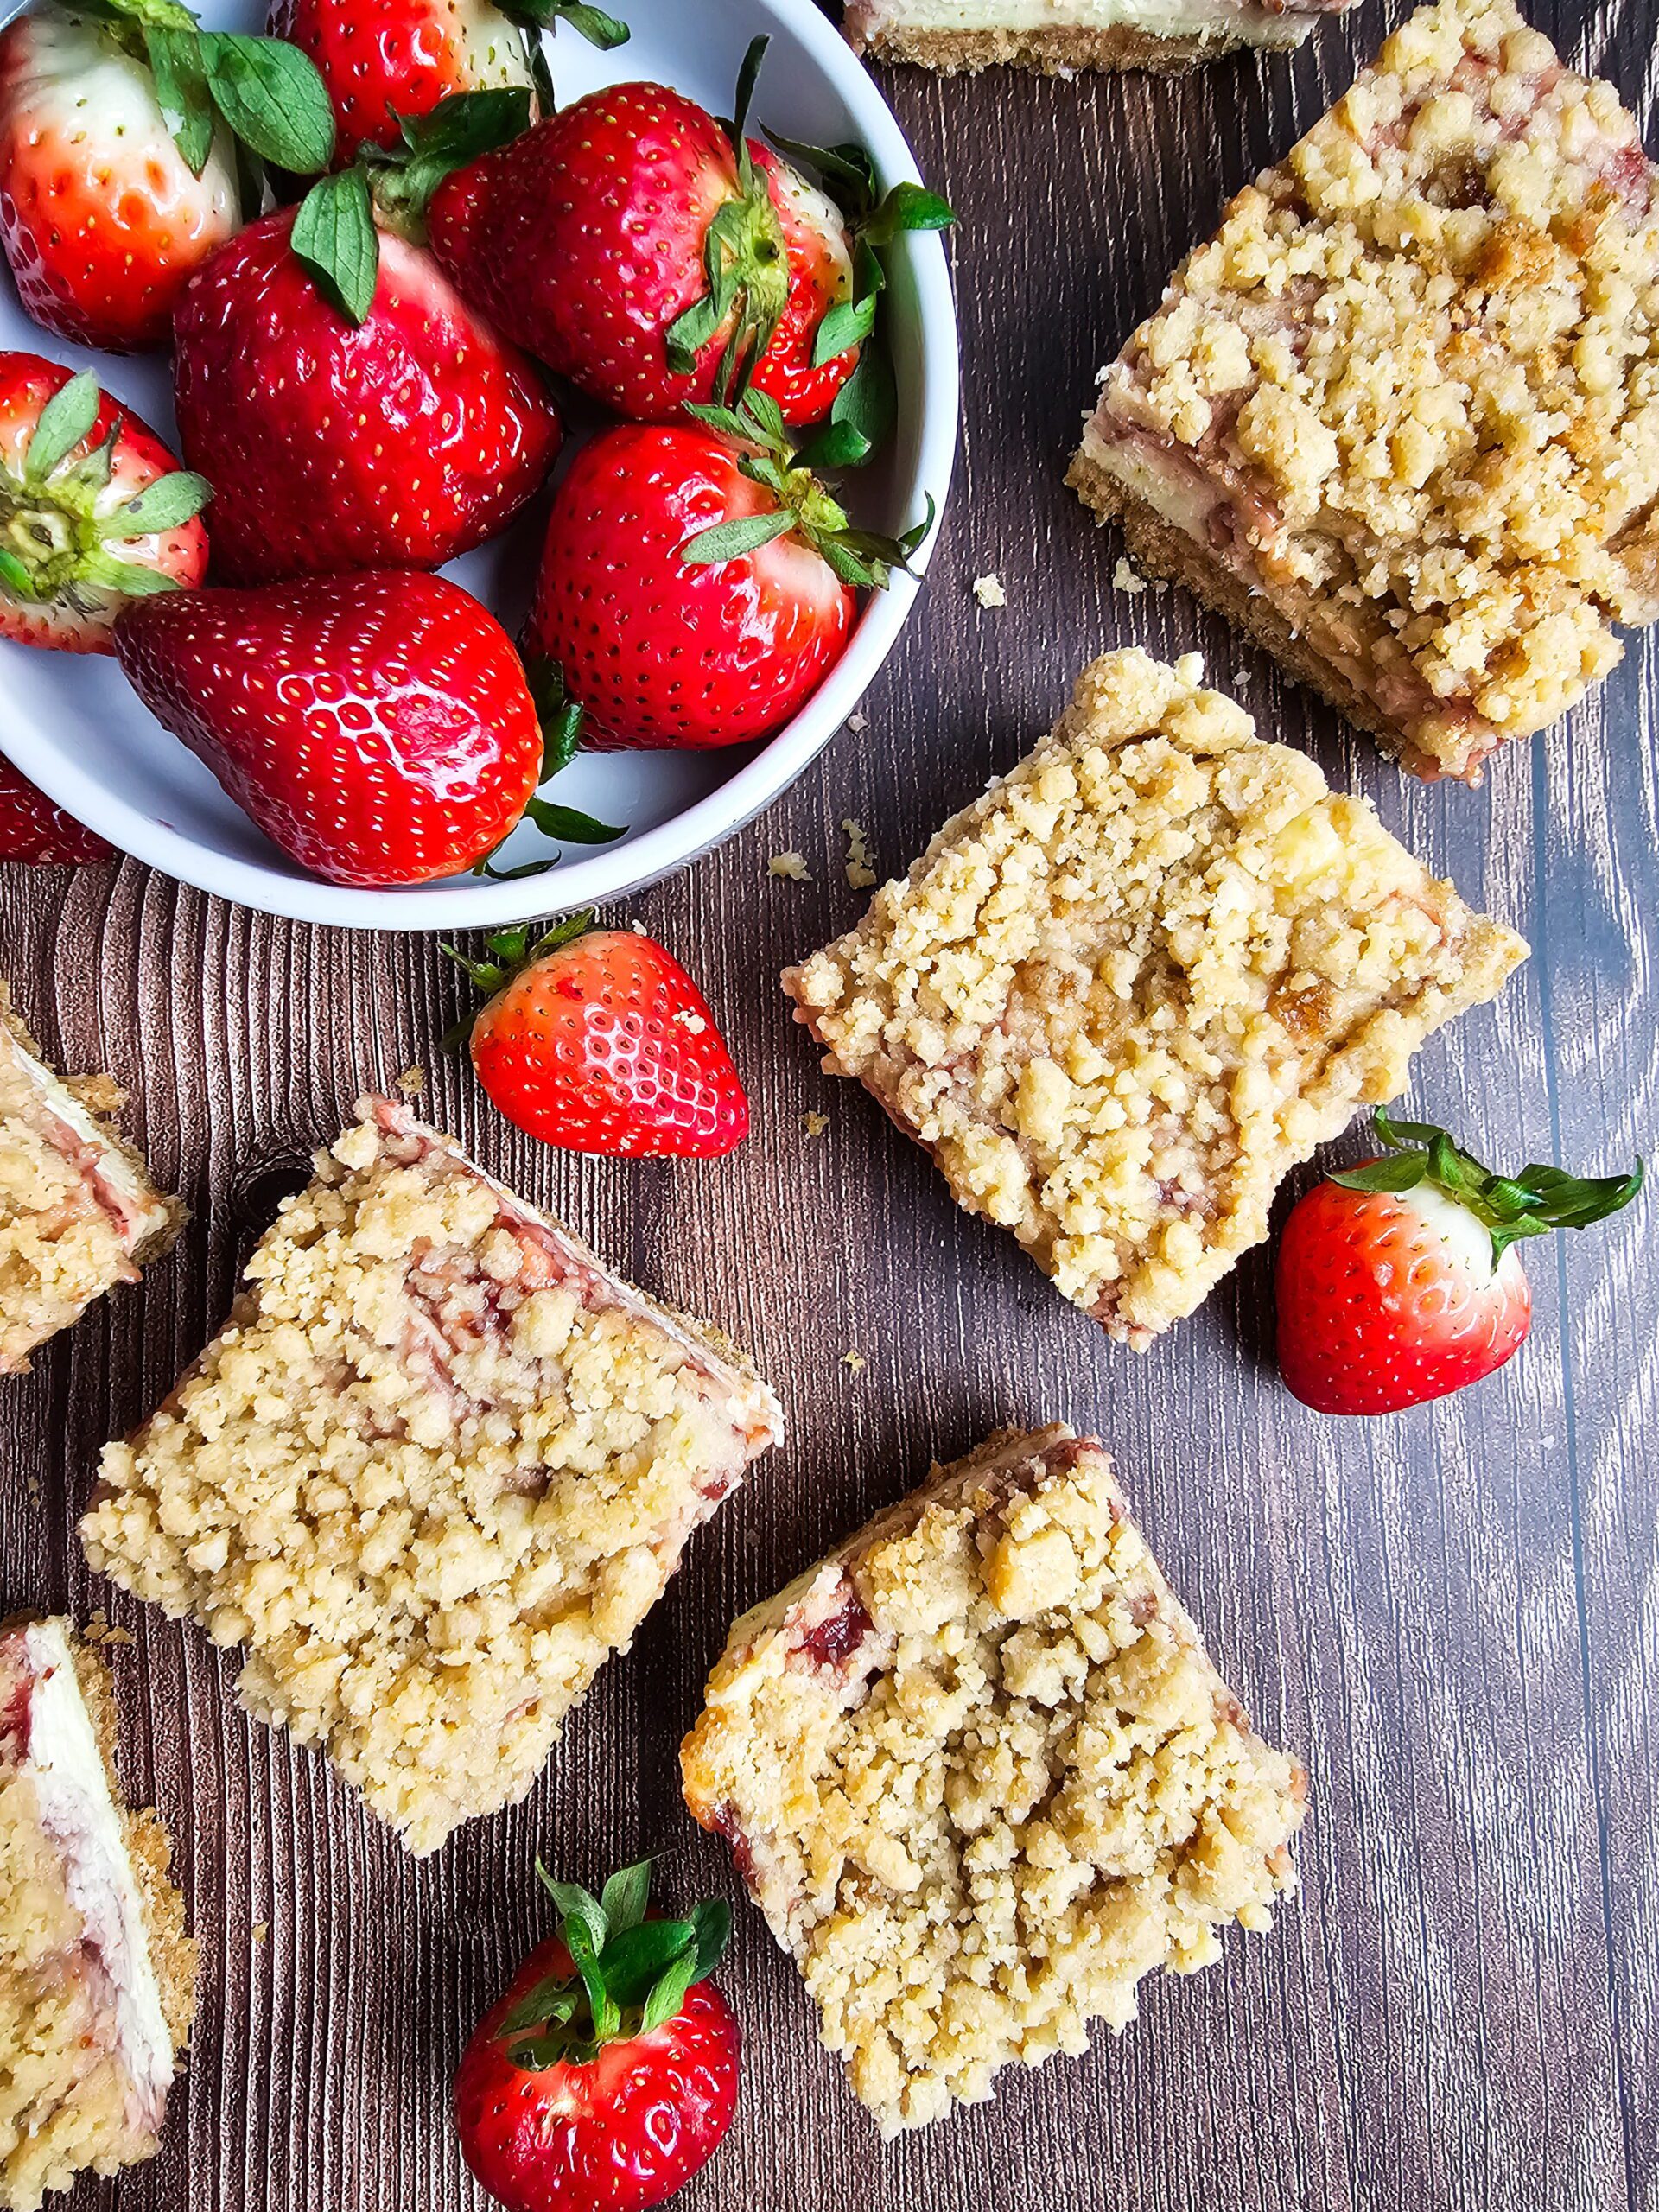
Cool the bars completely at room temperature, then refrigerate for at least 4 hours — overnight is better. Use the parchment overhang to lift the whole slab out onto a cutting board. Slice into bars with a sharp knife, wiping the blade clean between cuts for the cleanest edges.

Tips for the Best Strawberry Cheesecake Bars
- Room temperature ingredients are not negotiable. Cold cream cheese leaves lumps in the batter that don’t bake out. Cold eggs can cause the batter to curdle slightly when mixed. Pull everything out at least an hour before you start. If you forgot, cut the cream cheese into cubes and microwave in 10-second intervals until soft but not melted.
- Press the crust firmly and pre-bake it. The pre-bake step is what keeps the crust from going soggy. When butter in an unbaked crust meets a wet filling, it can steam rather than crisp. Ten minutes in the oven sets it.
- Cool the strawberry sauce completely before using. Warm sauce will sink into the cheesecake batter rather than sitting on top where it can be swirled. If you’re in a hurry, spread it in a thin layer on a plate and refrigerate for 15 minutes.
- Don’t over-swirl. This is the most common mistake. Three or four slow passes with a knife is plenty. More than that and the swirls disappear into pink batter. You want visible red ribbons, not a marbled pink filling.
- Wipe your knife between every slice. The filling is dense and sticky after chilling. A clean knife on every cut makes a meaningful difference in how the bars look when plated.
Strawberry Cheesecake Bar Substitutions and Variations
- For the crust: a digestive biscuit crust works in place of graham crackers and gives a slightly more buttery, less sweet base. Golden Oreos crushed and mixed with butter make a sweeter crust that pairs beautifully with the strawberry.
- For the strawberry sauce: fresh strawberries work just as well — hull them and use the same method. Other berries work too. A blueberry swirl or a mixed berry version of the sauce is excellent. Raspberry gives a more tart result and a deeper color.
- For the crumble: add ½ teaspoon of cinnamon to the crumble mixture for a warmer flavor. A handful of rolled oats mixed in gives extra texture. If you want to skip the crumble entirely, the bars are still great — just bake for 35–40 minutes instead.
- For a lemon cheesecake version: add 2 teaspoons of fresh lemon zest and 1 tablespoon of lemon juice to the cheesecake filling. It pairs exceptionally well with the strawberry swirl.

Make Ahead and Storage for These Cheesecake Bars
- Make ahead: these bars are ideal for making ahead. Assemble and bake the day before, chill overnight, and slice right before serving. The flavor actually improves after 24 hours as everything settles. You can also make the strawberry sauce up to 3 days in advance and refrigerate it covered until ready to use.
- Refrigerator: store sliced or unsliced bars covered in the refrigerator for up to 5 days. Place parchment between layers if stacking to prevent sticking.
- Freezer: these bars freeze well for up to 2 months. Freeze individual bars on a parchment-lined tray until solid, then transfer to a freezer bag. Thaw overnight in the refrigerator. The texture stays very close to fresh.
Frequently Asked Questions
Yes. Fresh strawberries work exactly the same way in the sauce. Use the same amount and the same method. Frozen strawberries are actually easier here because they’re already hulled and break down faster on the stovetop.
No. A water bath is used for full cheesecakes to prevent cracking and uneven baking. In a 9×13 pan at 325°F, the lower temperature and shallower filling mean a water bath isn’t necessary. The crumble topping also insulates the surface slightly.
Usually cracking comes from overmixing (which incorporates too much air), overbaking, or cooling too quickly. Mix the filling on low speed after adding the eggs, pull the bars from the oven when the center still has a slight jiggle, and let them cool at room temperature before refrigerating.
Yes, an 8×8 or 9×9 inch pan works. You’ll need to halve the recipe or bake a thicker version — add 10–15 minutes to the bake time and check for the jiggle test.
Chill the bars fully — overnight is best. Use a sharp chef’s knife rather than a serrated knife. Wipe the blade with a damp cloth between every single cut. Some bakers also find that running the knife briefly under warm water helps.
For serving, yes — up to 2 hours at room temperature is fine. After that, refrigerate them. Cheesecake is a dairy product and should not be left out for extended periods.
This usually happens when the crumble is packed too tightly onto the filling or when the bars are cut before they’ve chilled fully. Sprinkle the crumble loosely, don’t press it in, and make sure to chill completely before slicing.
Looking for more cheesecake recipes? Try these!
Blueberry Cheesecake Crumble Bars
Creamy Banana Pudding Cheesecake
Creamy German Chocolate Cheesecake
Final Thoughts
Strawberry cheesecake bars show up on a lot of dessert tables, and most of them are forgettable — a thin crust, a mild filling, some jam swirled in. This version is built differently. The crust has real presence, the filling is dense and creamy from four full blocks of cream cheese, the strawberry sauce is made from scratch in ten minutes, and the crumble on top is the detail that takes it from standard to something people ask about. Make it the night before, pull it from the fridge right before serving, and watch it disappear faster than anything else on the table.
Strawberry Cheesecake Bars with Crumble Topping (9×13 Pan)
Equipment
- 9×13 baking dish
Ingredients
Thick Graham Cracker Crust:
- 2 ½ cups graham cracker crumbs (210g)(about 18-20 sheets)
- 10 tablespoons unsalted butter (melted)
- ⅓ cup granulated sugar (67g)
Strawberry Swirl (from frozen strawberries):
- 2 cups strawberries (frozen)(no need to thaw first)
- ¼ cup granulated sugar (50g)
- 1 tablespoon lemon juice
- 1 teaspoon cornstarch (+1 tablespoon water)(slurry)
Cheesecake Filling:
- 32 oz cream cheese (4) 8 oz bricks) (room temperature)
- 4 eggs room temperature
- ¾ cup granulated sugar (150g)
- 2 teaspoons vanilla extract
- ½ teaspoon kosher salt
Crumble Topping:
- 1 ¼ cups all-purpose flour (156g)
- ½ cup light brown sugar (100g)(packed)
- ½ teaspoon kosher salt
- 8 tablespoons unsalted butter (melted)
Instructions
- Prepare the pan: Preheat your oven to 325°F (163°C). Line a 9×13-inch baking dish with parchment paper and leave enough overhang on both sides to use as handles when lifting the bars out later. Lightly grease the parchment.
- Make the strawberry swirl: In a medium saucepan, combine the frozen strawberries, sugar, and lemon juice. Cook over medium heat, stirring occasionally, until the berries break down and release their juice — about 8–10 minutes. Stir in the cornstarch slurry and cook another 1–2 minutes until the sauce thickens noticeably. At this point you can blend it slightly for a smoother sauce or leave it a bit chunky for more texture. Transfer to a bowl and let it cool completely before using. This step can be done an hour ahead or even the day before.
- Make the crust: In a large bowl, mix the graham cracker crumbs, melted butter, and sugar until the mixture looks like wet sand and holds together when squeezed. Pour it into the prepared pan and press it into an even layer using your hands first, then compact it firmly with the flat bottom of a measuring cup or drinking glass. Get the edges tight. Bake for 10 minutes, then set aside to cool slightly while you make the filling.
- Make the cheesecake filling: Beat the room temperature cream cheese with an electric mixer on medium speed until completely smooth, about 2 minutes. Scrape the bowl down. Add the sugar and beat until fully incorporated. Add the eggs one at a time, mixing on low speed after each one — low speed is important here because you don’t want to whip air into the batter, which can cause cracking. Mix in the vanilla and salt. Stop as soon as everything is combined.
- Pour the cheesecake filling evenly over the slightly cooled crust and spread it to the edges with a spatula. Drop spoonfuls of the cooled strawberry sauce across the top — aim for about 20 small dollops spread evenly rather than a few big ones. Use a butter knife or skewer to gently swirl: drag it through in slow S-curves without going all the way to the bottom. You want defined ribbons of strawberry, not a pink filling. Less swirling gives you better visual definition.
- Make and add the crumble. In a bowl, whisk together the flour, brown sugar, and salt. Pour in the melted butter and stir until the mixture forms clumpy, uneven crumbles — some larger, some smaller. Don’t overwork it or it’ll turn into a paste. Sprinkle the crumble evenly over the top of the assembled bars. Don’t press it in.
- Bake uncovered at 325°F for 40–45 minutes. The center should be just set and have a slight jiggle when you gently shake the pan — it will firm up fully as it chills. The crumble on top should be golden. If the crumble is browning too fast before the center sets, loosely tent with foil.
- Cool the bars completely at room temperature, then refrigerate for at least 4 hours — overnight is better. Use the parchment overhang to lift the whole slab out onto a cutting board. Slice into bars with a sharp knife, wiping the blade clean between cuts for the cleanest edges.