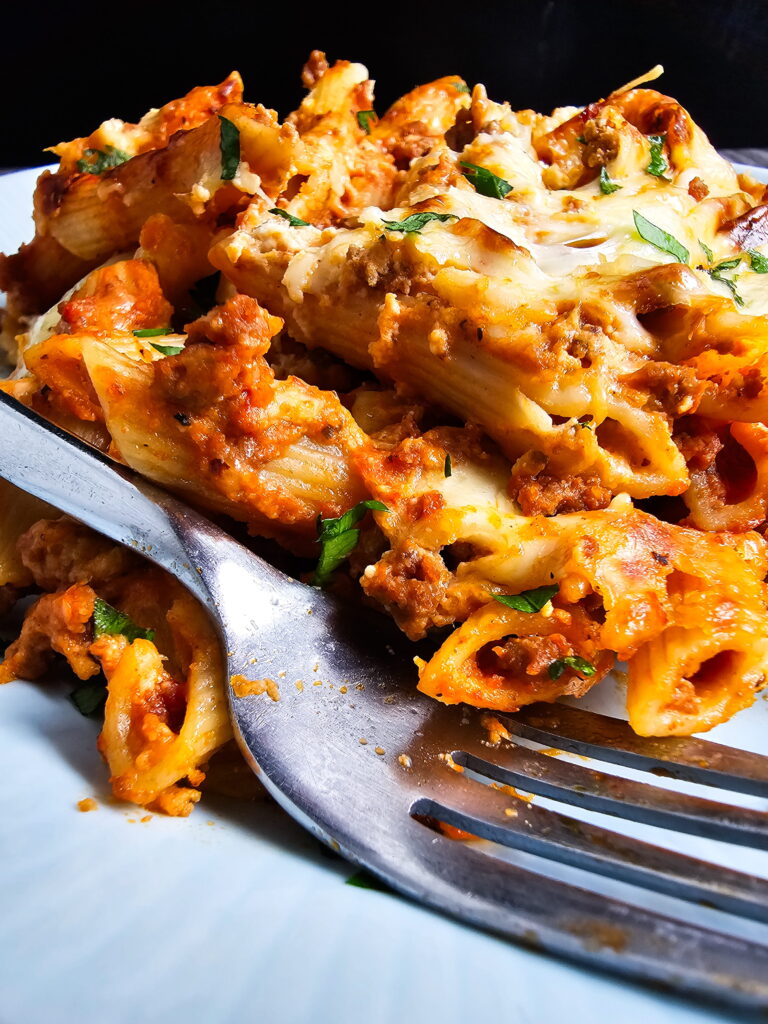
I have made baked ziti more times than I can count. And for a long time, mine kept coming out the same way — watery, falling apart, and disappointing. If your baked ziti with ricotta keeps turning into a soupy mess — this post is for you. The ricotta goes watery. The whole dish slides apart when you cut it. The pasta turns soft and heavy. And after all that effort, it is frustrating.
This recipe fixes every single one of those problems. The ricotta layer sets firm and slices cleanly. The meat sauce is rich and deep — not thin and flat. The pasta stays perfectly tender — not mushy. And the whole dish holds together on the plate as it should.
You do not need fancy ingredients or advanced cooking skills. You need four specific techniques that most recipes skip entirely. Once you know them, you will never make watery baked ziti again.
Why Baked Ziti with Ricotta Turns Watery (And How to Fix It)
Most baked ziti with ricotta recipes have the same four problems. Understanding why they happen is the first step to fixing them.
The biggest problem is ricotta without an egg. Plain ricotta contains a lot of moisture. When it heats up in the oven, that moisture releases into the dish. The result is a watery, soupy layer that ruins the texture of everything around it. Adding one egg to the ricotta mixture binds it during baking. The ricotta sets into a creamy but firm layer instead of a puddle. This is the single most important fix in the entire recipe.
The science behind this is straightforward. Ricotta is a fresh cheese with high moisture content. According to the Serious Eats Food Lab, eggs act as a binding protein network when heated — they set around other ingredients and hold moisture in place rather than letting it escape. That is exactly what happens in the ricotta layer when you add one egg. It goes from loose and wet to firm and sliceable.
The second problem is fully cooked pasta going into the oven. Pasta that is already soft absorbs sauce and turns mushy during baking. Cook your ziti one to two minutes less than the package says. It finishes cooking in the oven and comes out perfectly tender every time.
The third problem is sauce that never developed any real flavor. Jarred marinara poured straight into a pan with browned beef tastes flat. Cooking tomato paste directly in the pan for two minutes before adding the sauce changes everything. It builds a deep, caramelized base that makes the whole dish taste homemade.
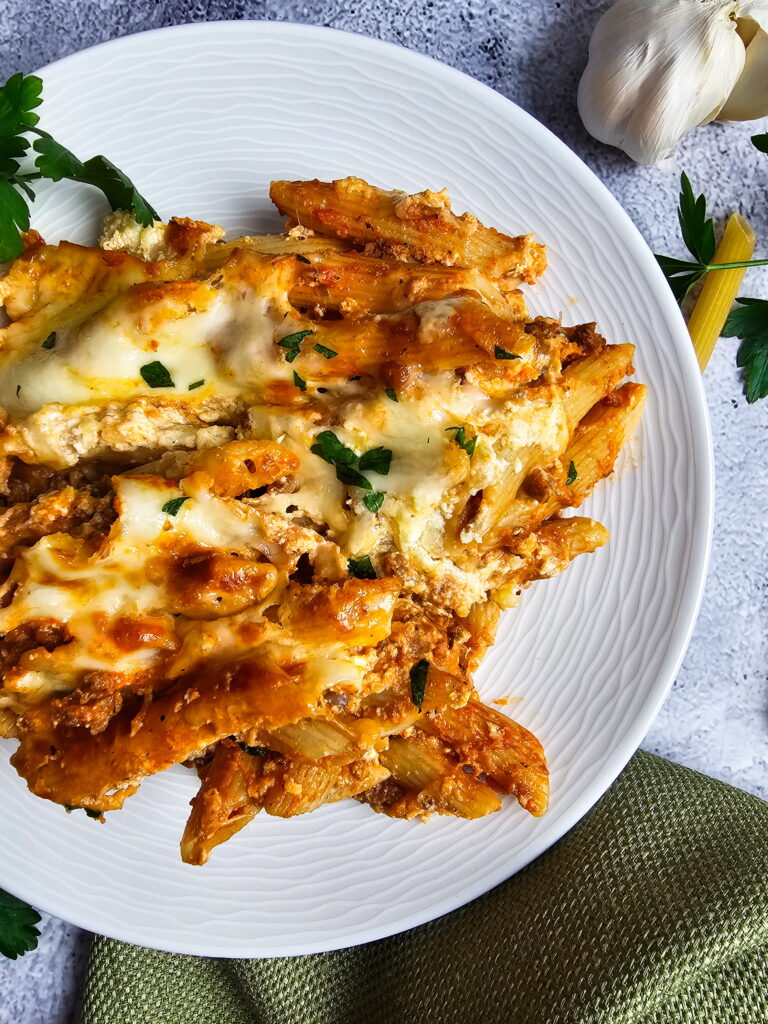
The fourth problem is cutting the dish too soon. Hot baked ziti is still loose and unstable right out of the oven. Ten to fifteen minutes of resting lets every layer firm up. Skip it and you get a messy scoop instead of a clean slice.
The Sour Cream Secret That Makes This Ricotta Different
Most ricotta mixtures use ricotta, egg, and parsley. After testing this recipe multiple times, adding sour cream was the single change that made the biggest difference in texture and creaminess.
Sour cream keeps the ricotta layer creamy without making it loose. It adds a very subtle tang that balances the richness of the mozzarella. And it helps the mixture spread more easily during assembly.
The combination of ricotta, sour cream, egg, and parmesan bakes into something special. It is creamy but firm. Rich but not heavy. And it holds together cleanly when you slice it.
This is the version you will make every time from now on.
Ingredients for Baked Ziti with Ricotta
Everything here comes from a regular grocery store. Nothing fancy, nothing hard to find.
For the Pasta:
- 1 lb ziti pasta
- Salt for the water
For the Meat Sauce:
- 1 lb ground beef
- ½ onion, finely diced
- 2 cloves garlic, minced
- 1 tbsp olive oil
- 1 to 2 tbsp tomato paste
- 1 jar (24 oz) marinara sauce
- ½ tsp sugar
- 1 tsp Italian seasoning or dried oregano
- Salt and pepper to taste
Ricotta Layer (the fix):
- 1 cup whole milk ricotta cheese
- ½ cup sour cream
- 1 egg
- ½ cup grated Parmesan cheese
- Salt and pepper to taste
Cheese Topping:
- 2 cups low-moisture shredded mozzarella, divided
- Extra Parmesan for the top (optional)
To Finish:
- Fresh basil or parsley, chopped

How to Make Baked Ziti with Ricotta That Holds Together
Time needed: 45 minutes
- Cook the Pasta Just Under Al Dente
Bring a large pot of well-salted water to a boil. Cook the ziti one to two minutes less than the package directions. It should be slightly firm when you bite it — not fully cooked. Drain it and set it aside.
This step prevents mushy pasta. The ziti will absorb sauce and finish cooking in the oven. If it is already fully cooked going in, it has nowhere to go but soft. - Build a Proper Meat Sauce (This Is Where Flavor Happens)
Heat olive oil in a large skillet over medium-high heat. Add the ground beef and diced onion together. Cook until the beef is browned, and the onion is soft — about 8 minutes. Do not stir it constantly. Let it sit and develop color on the bottom. That caramelization is a flavor you cannot add later.
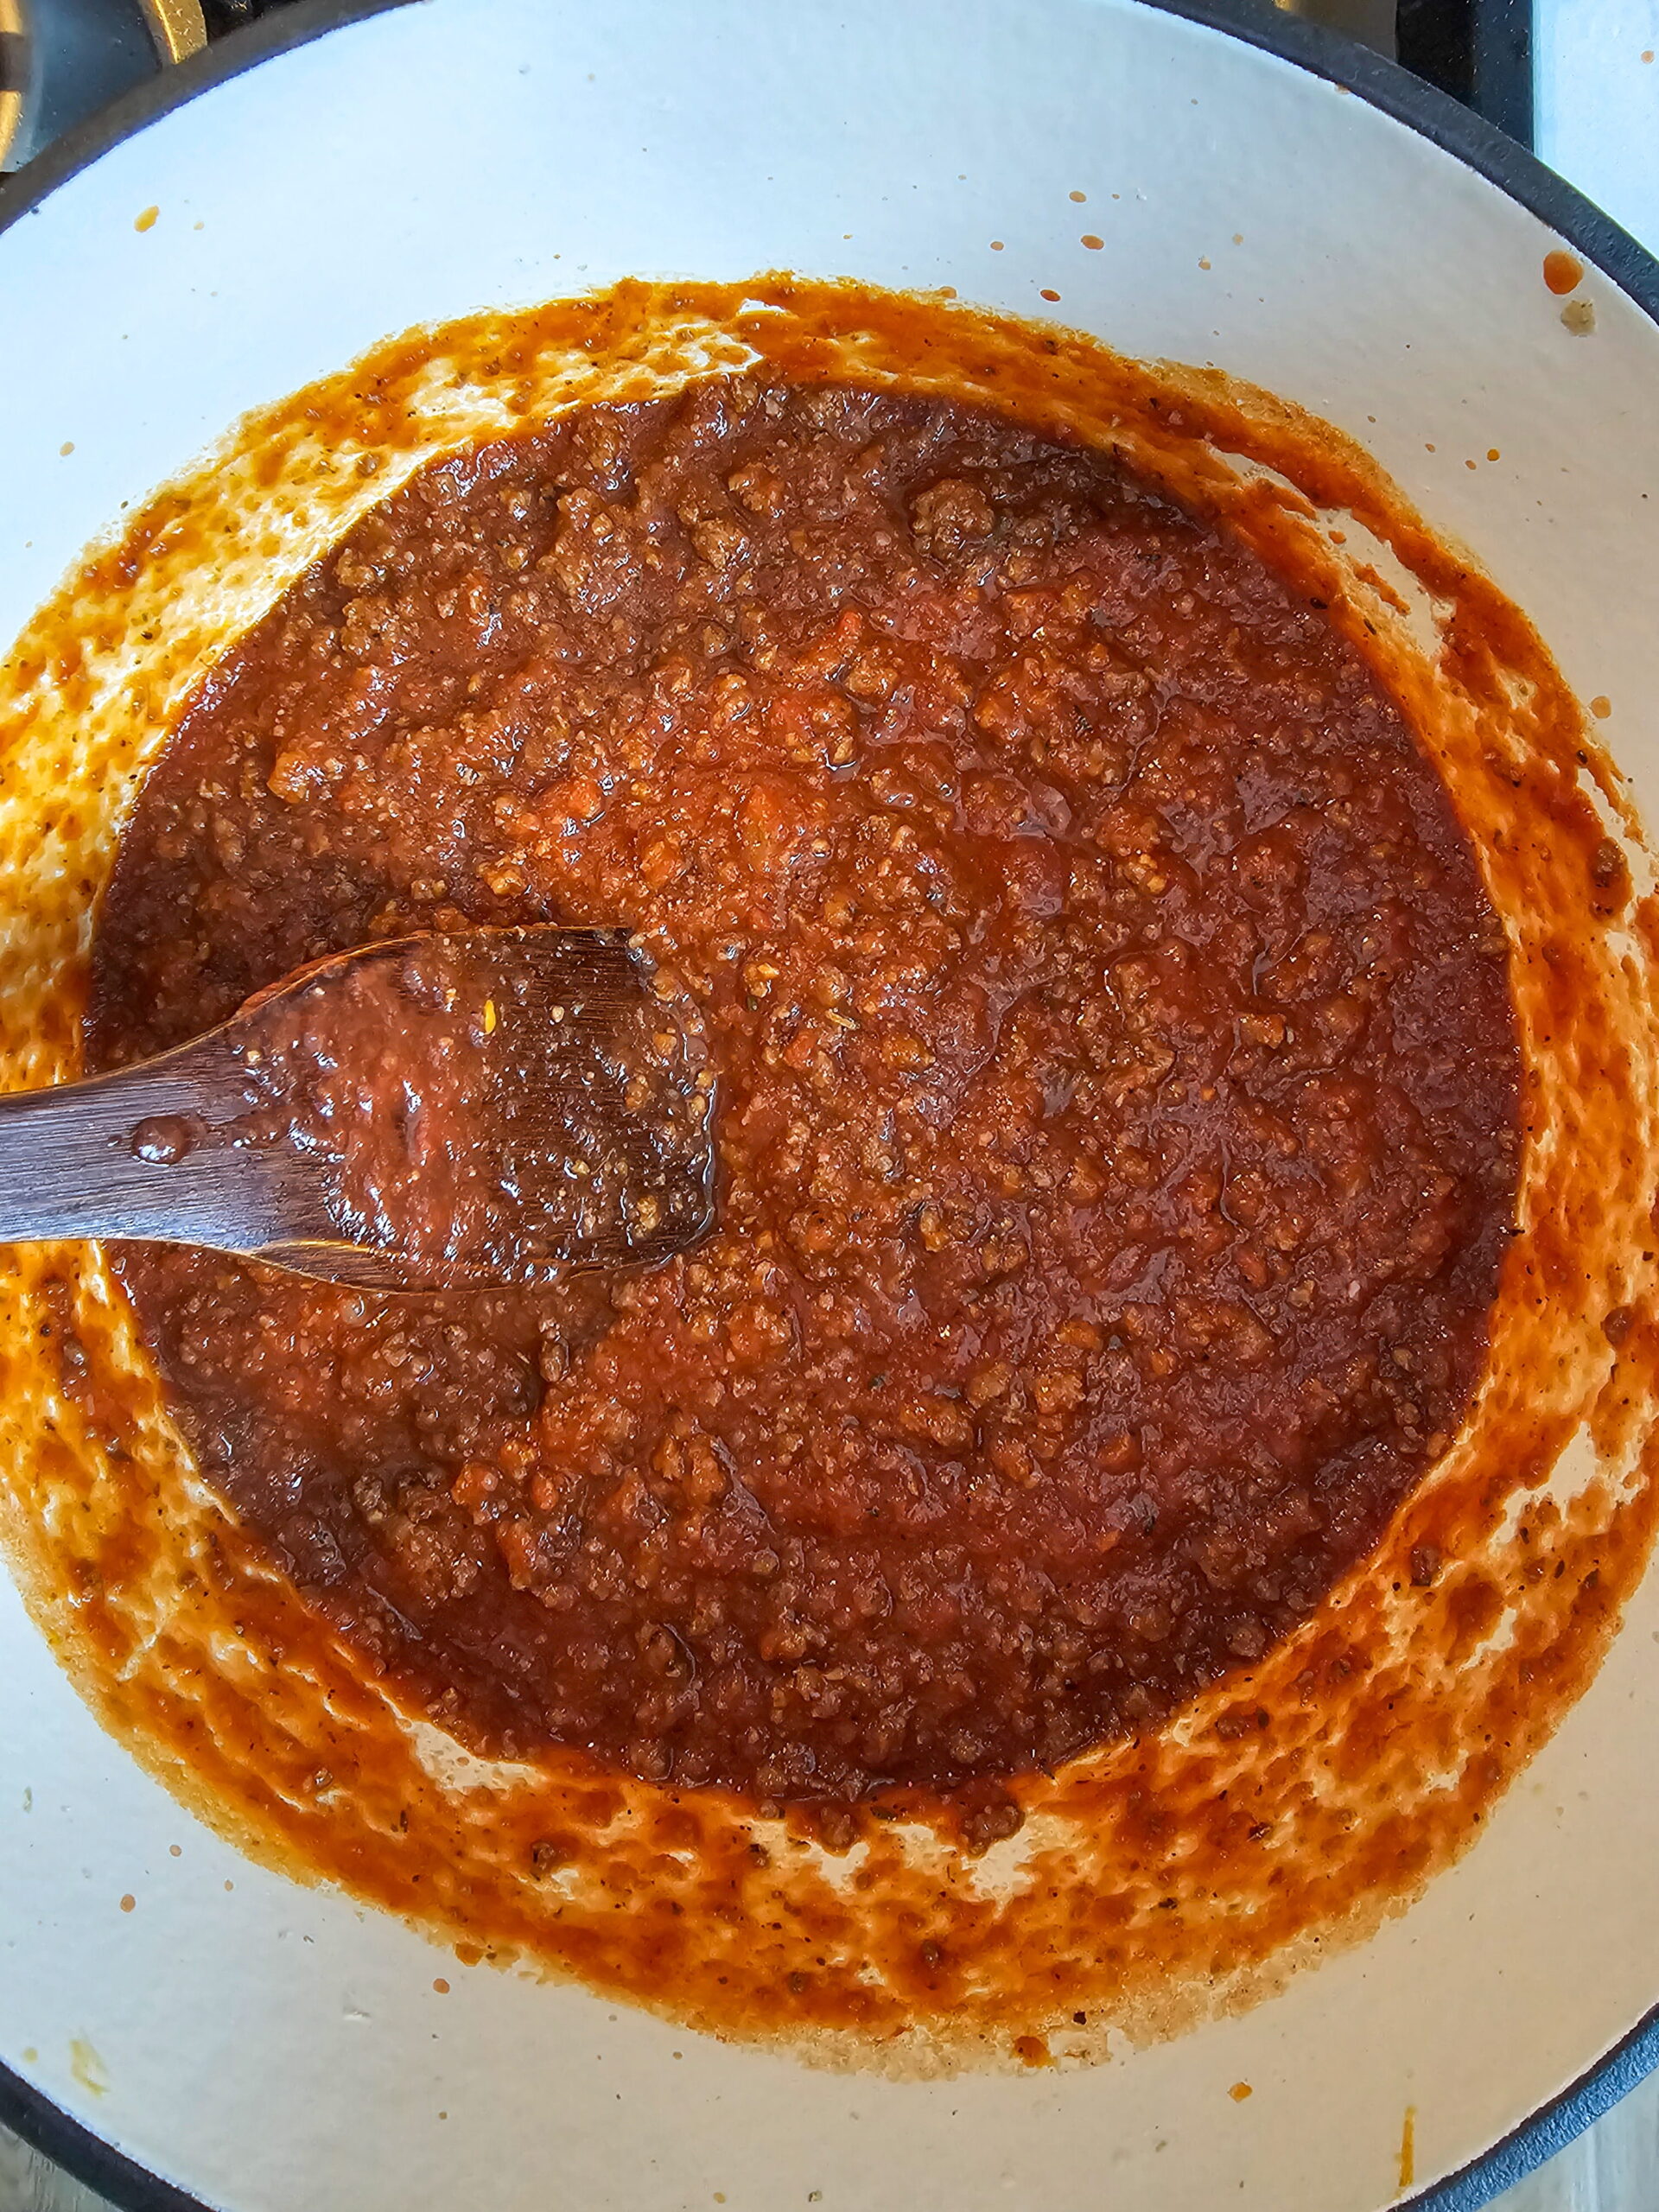
Add the minced garlic and cook for 30 seconds. Now add the tomato paste directly to the pan. Stir it into the beef mixture and cook for one to two full minutes. It will darken slightly and smell incredible. This is called blooming — it removes the raw tinny taste completely. It makes jarred sauce taste like it simmered for hours.
Add the marinara sauce, sugar, and Italian seasoning. Stir together and simmer for 10 minutes. Taste and season with salt and pepper.
- Make the Ricotta Mixture That Actually Sets
In a medium bowl, combine the whole milk ricotta, sour cream, egg, and Parmesan. Add a pinch of salt and pepper. Mix until completely smooth.
The egg is the most critical ingredient here. It binds the ricotta proteins as they heat in the oven. Without it, the ricotta releases water and turns the whole dish soupy. The sour cream adds creaminess without adding loose liquid. Together they bake into a layer that slices cleanly every time.
Do not use part-skim ricotta here. Part-skim has more water content and will release more liquid during baking. Whole milk ricotta has the fat content needed to stay rich and set properly. - Layer It Properly (Do Not Mix Everything Together)
Preheat your oven to 375°F.
Spread a thin layer of meat sauce across the bottom of a 9×13 baking dish. This prevents the bottom layer of pasta from sticking and drying out.
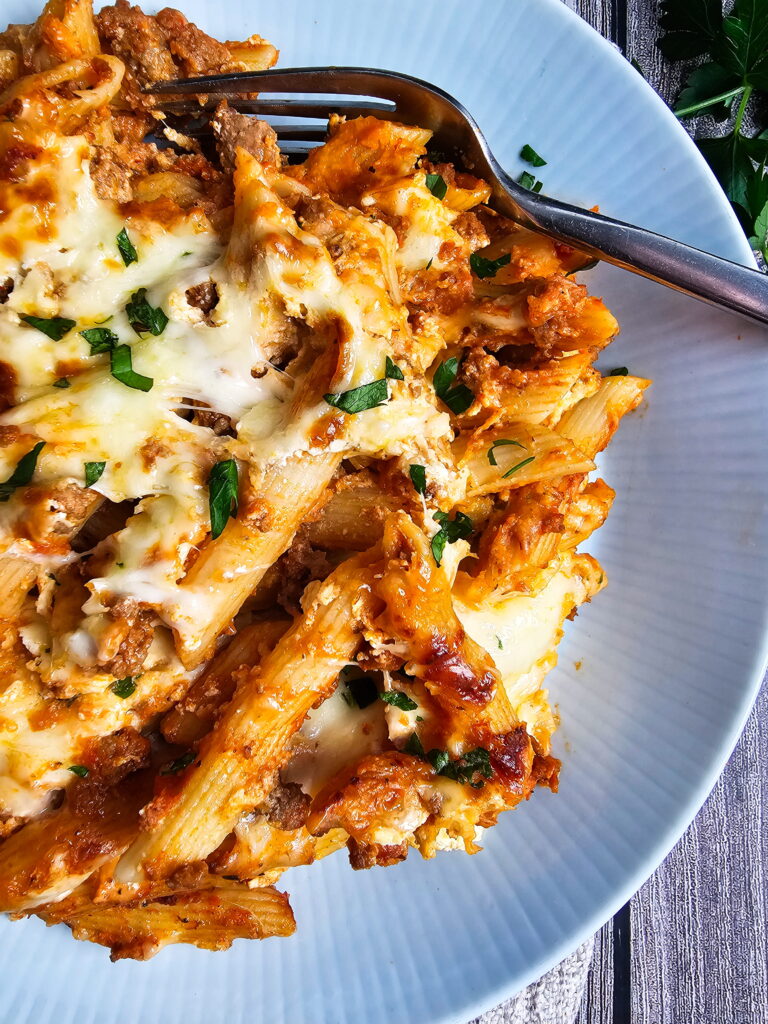
Add half the cooked pasta in an even layer. Dollop half the ricotta mixture over the pasta. Spread it gently — do not press hard, or it will mix into the pasta. Spoon half the remaining meat sauce evenly over the ricotta. Sprinkle one cup of shredded mozzarella over the sauce.
Now repeat the layers. Add the remaining pasta, then the remaining ricotta mixture. Spoon the remaining sauce on top. Finish with the second cup of mozzarella. Add a generous sprinkle of Parmesan if using.
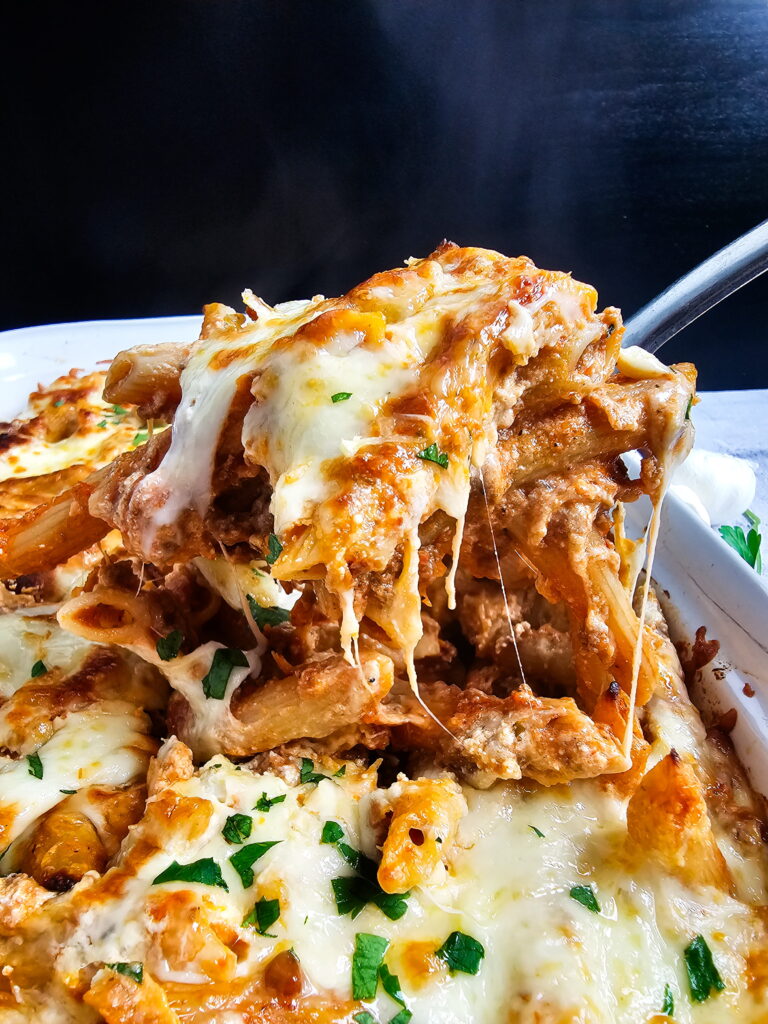
The layering method matters. Mixing everything together creates a uniform casserole with no texture. Distinct layers give you ricotta in every bite, sauce in every bite, and cheese in every bite. - Bake It
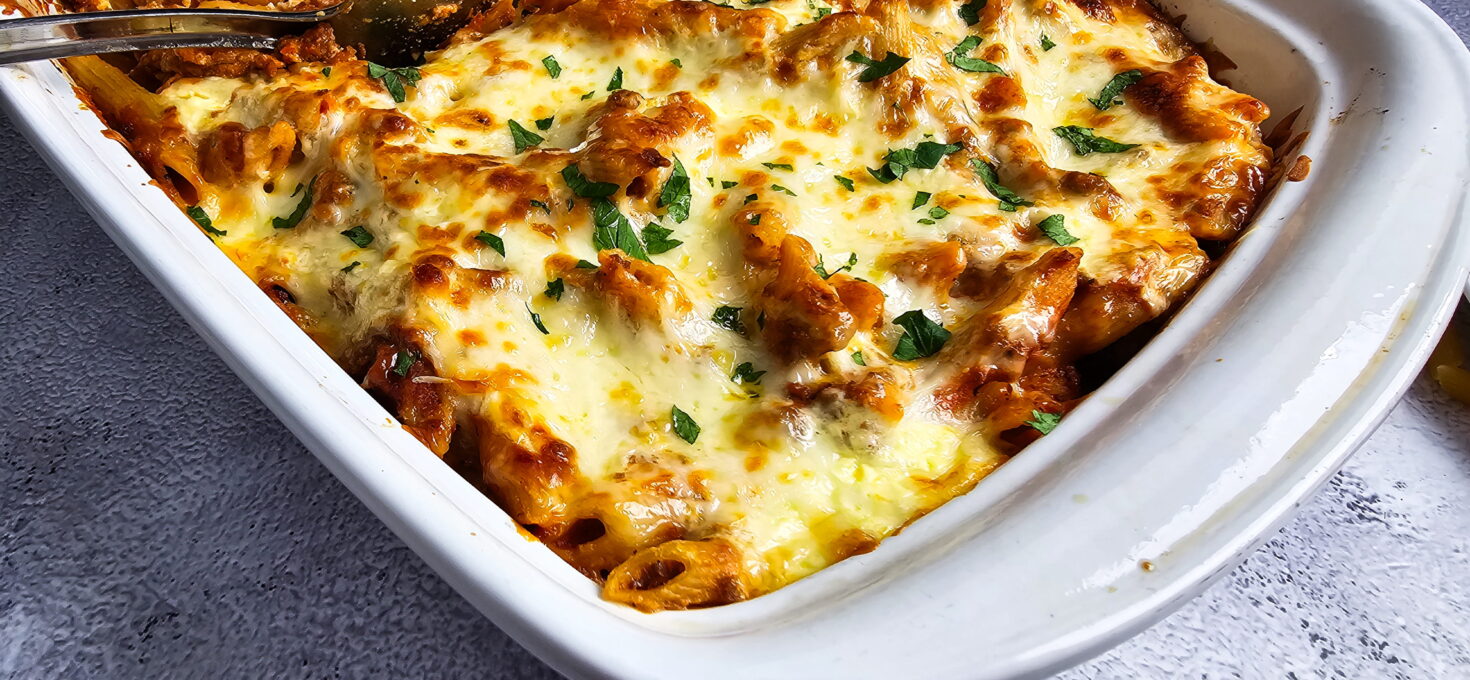
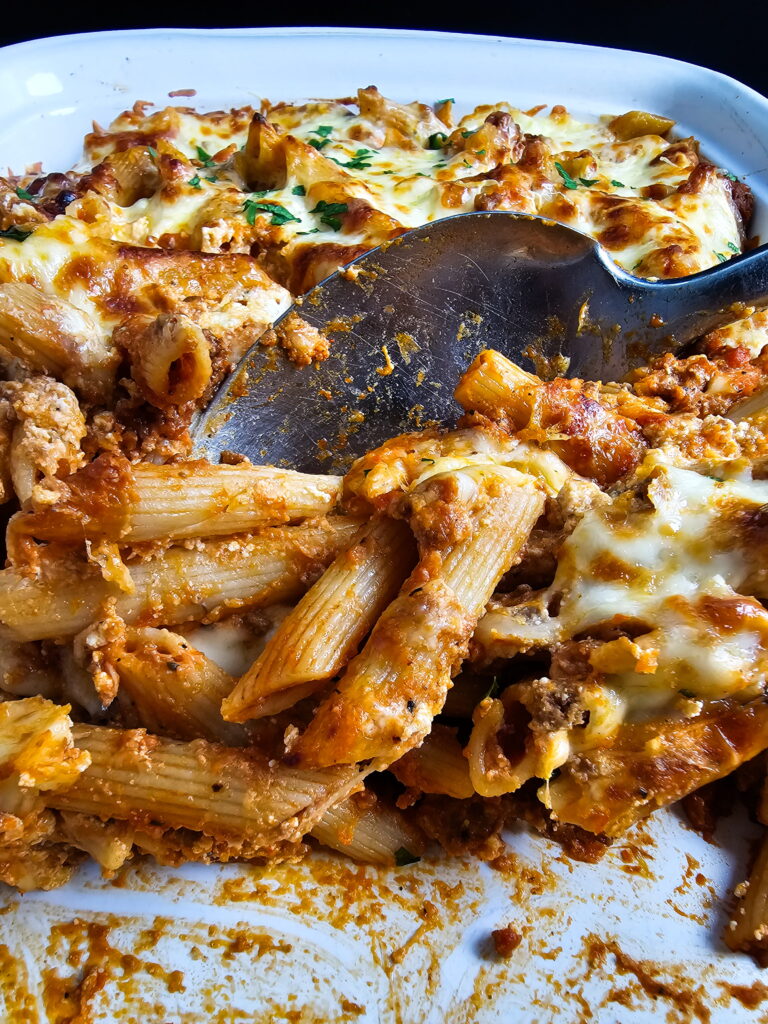
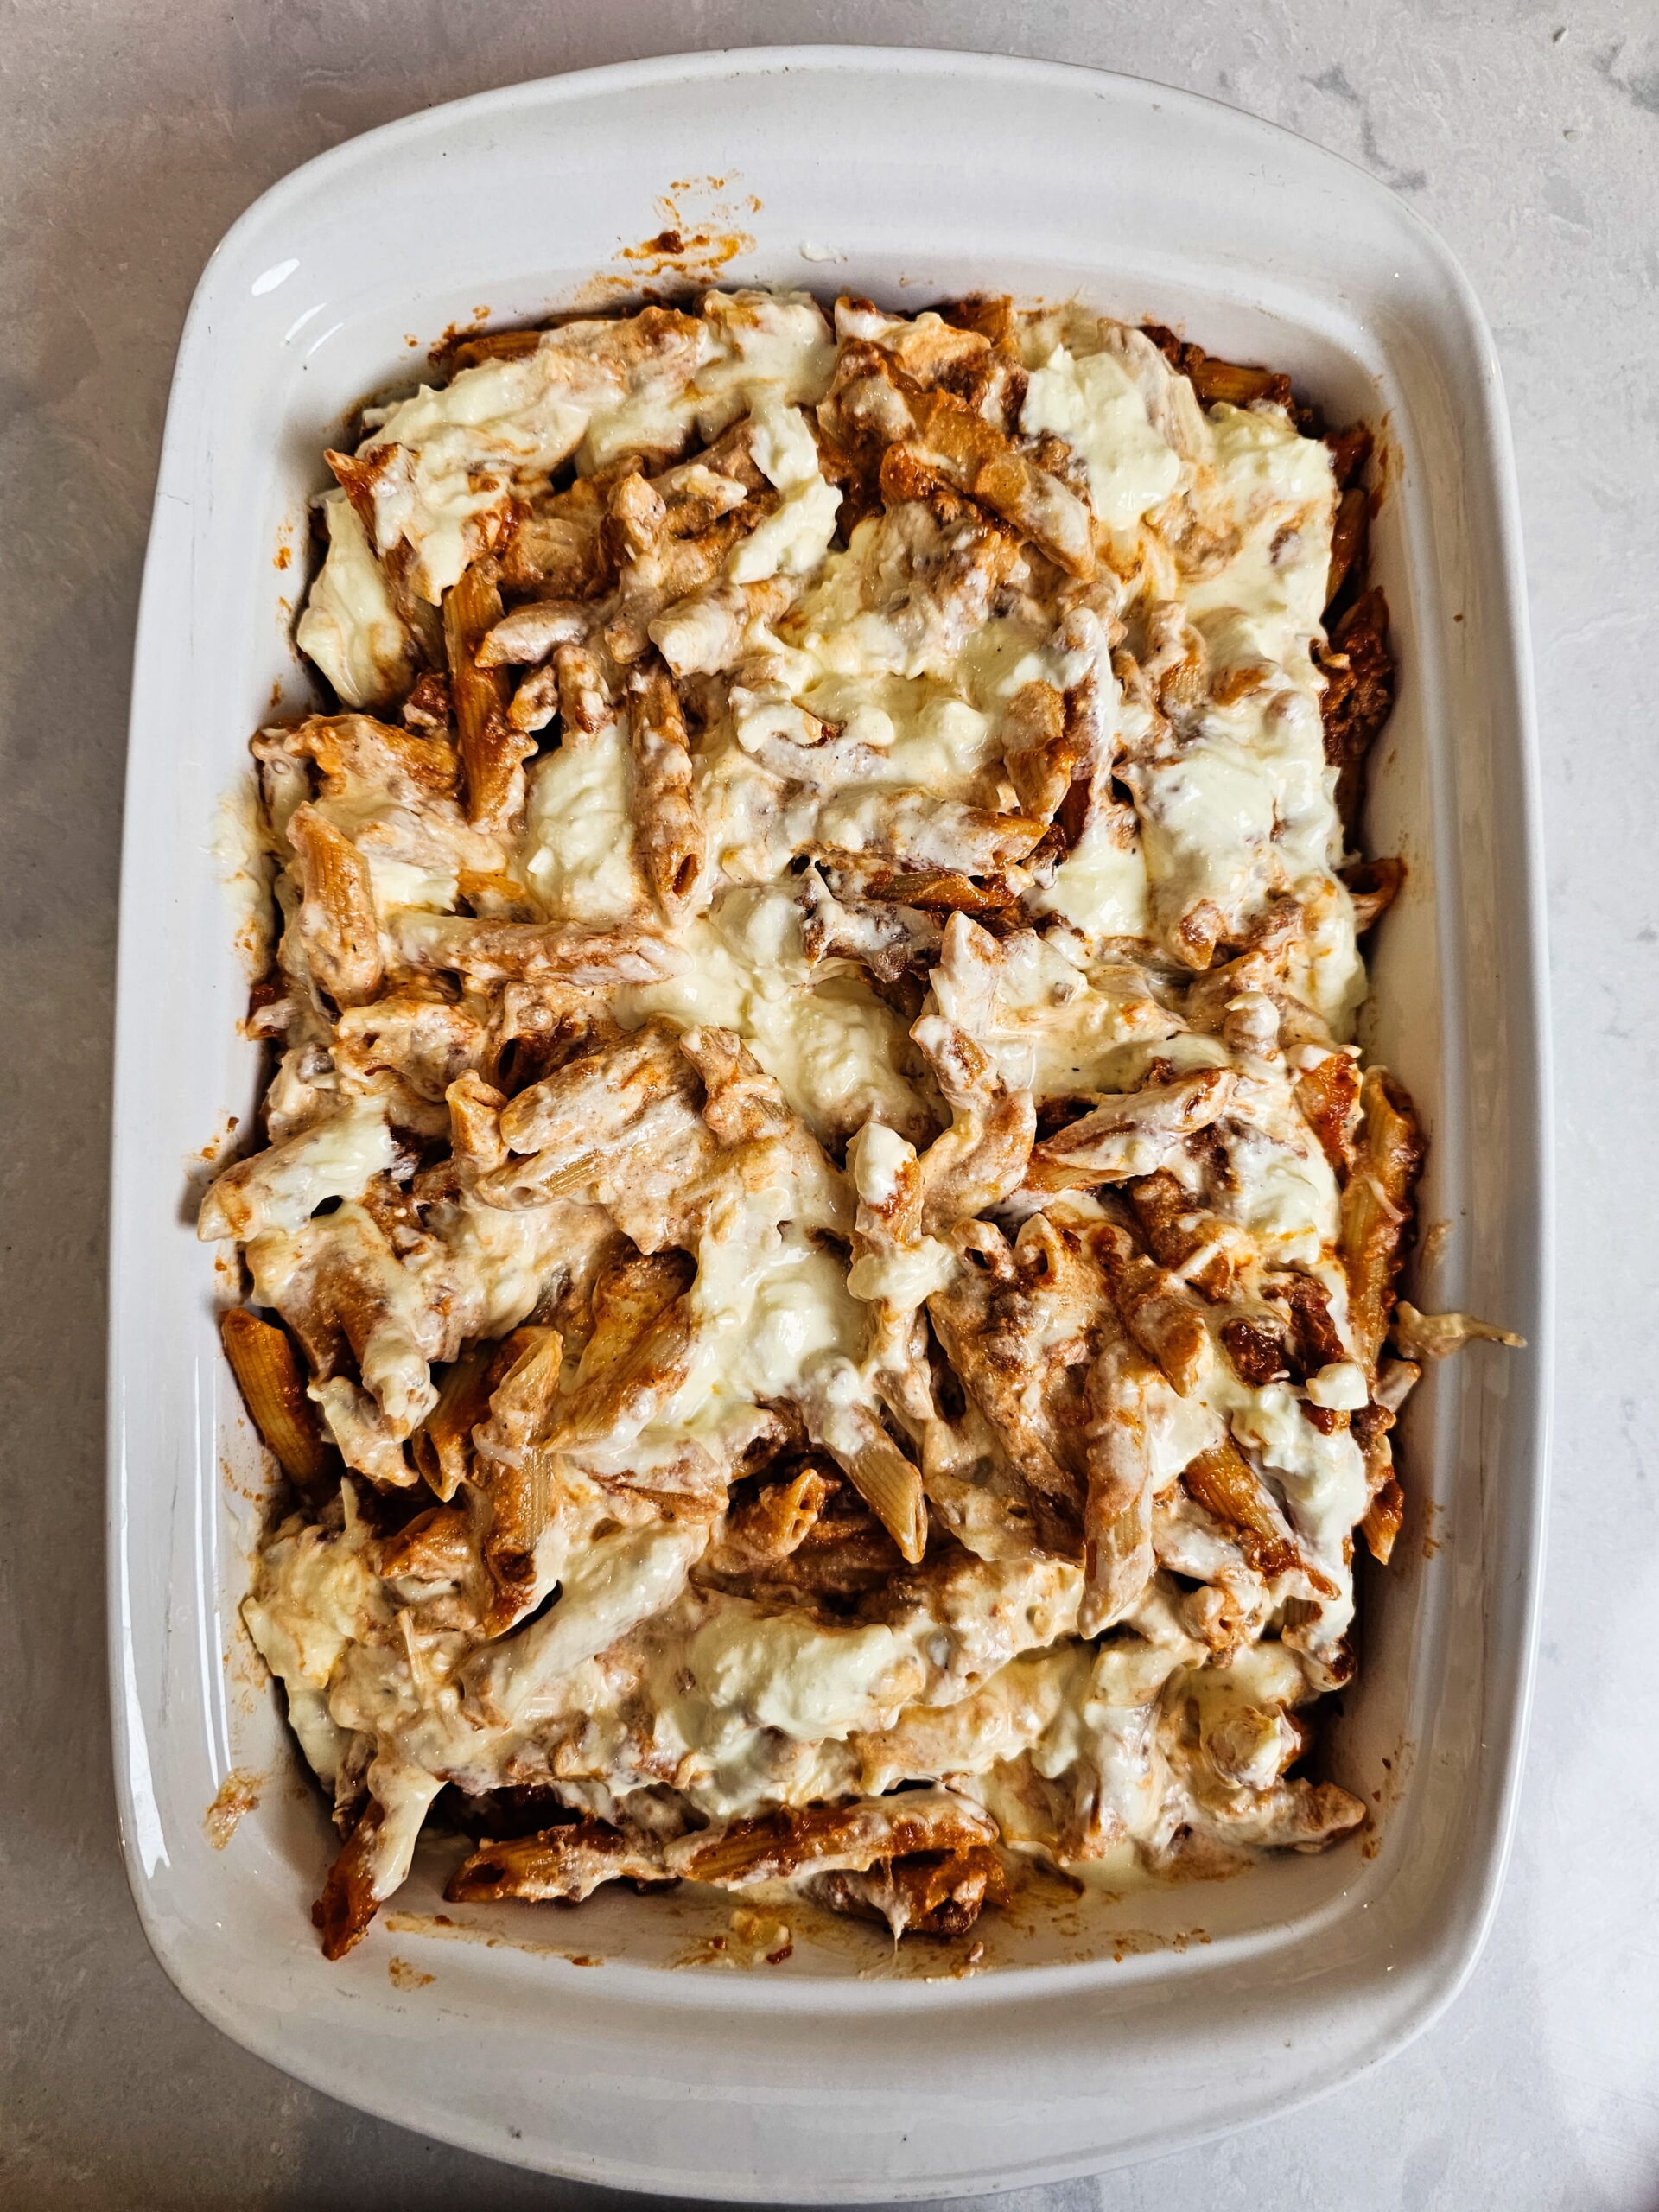
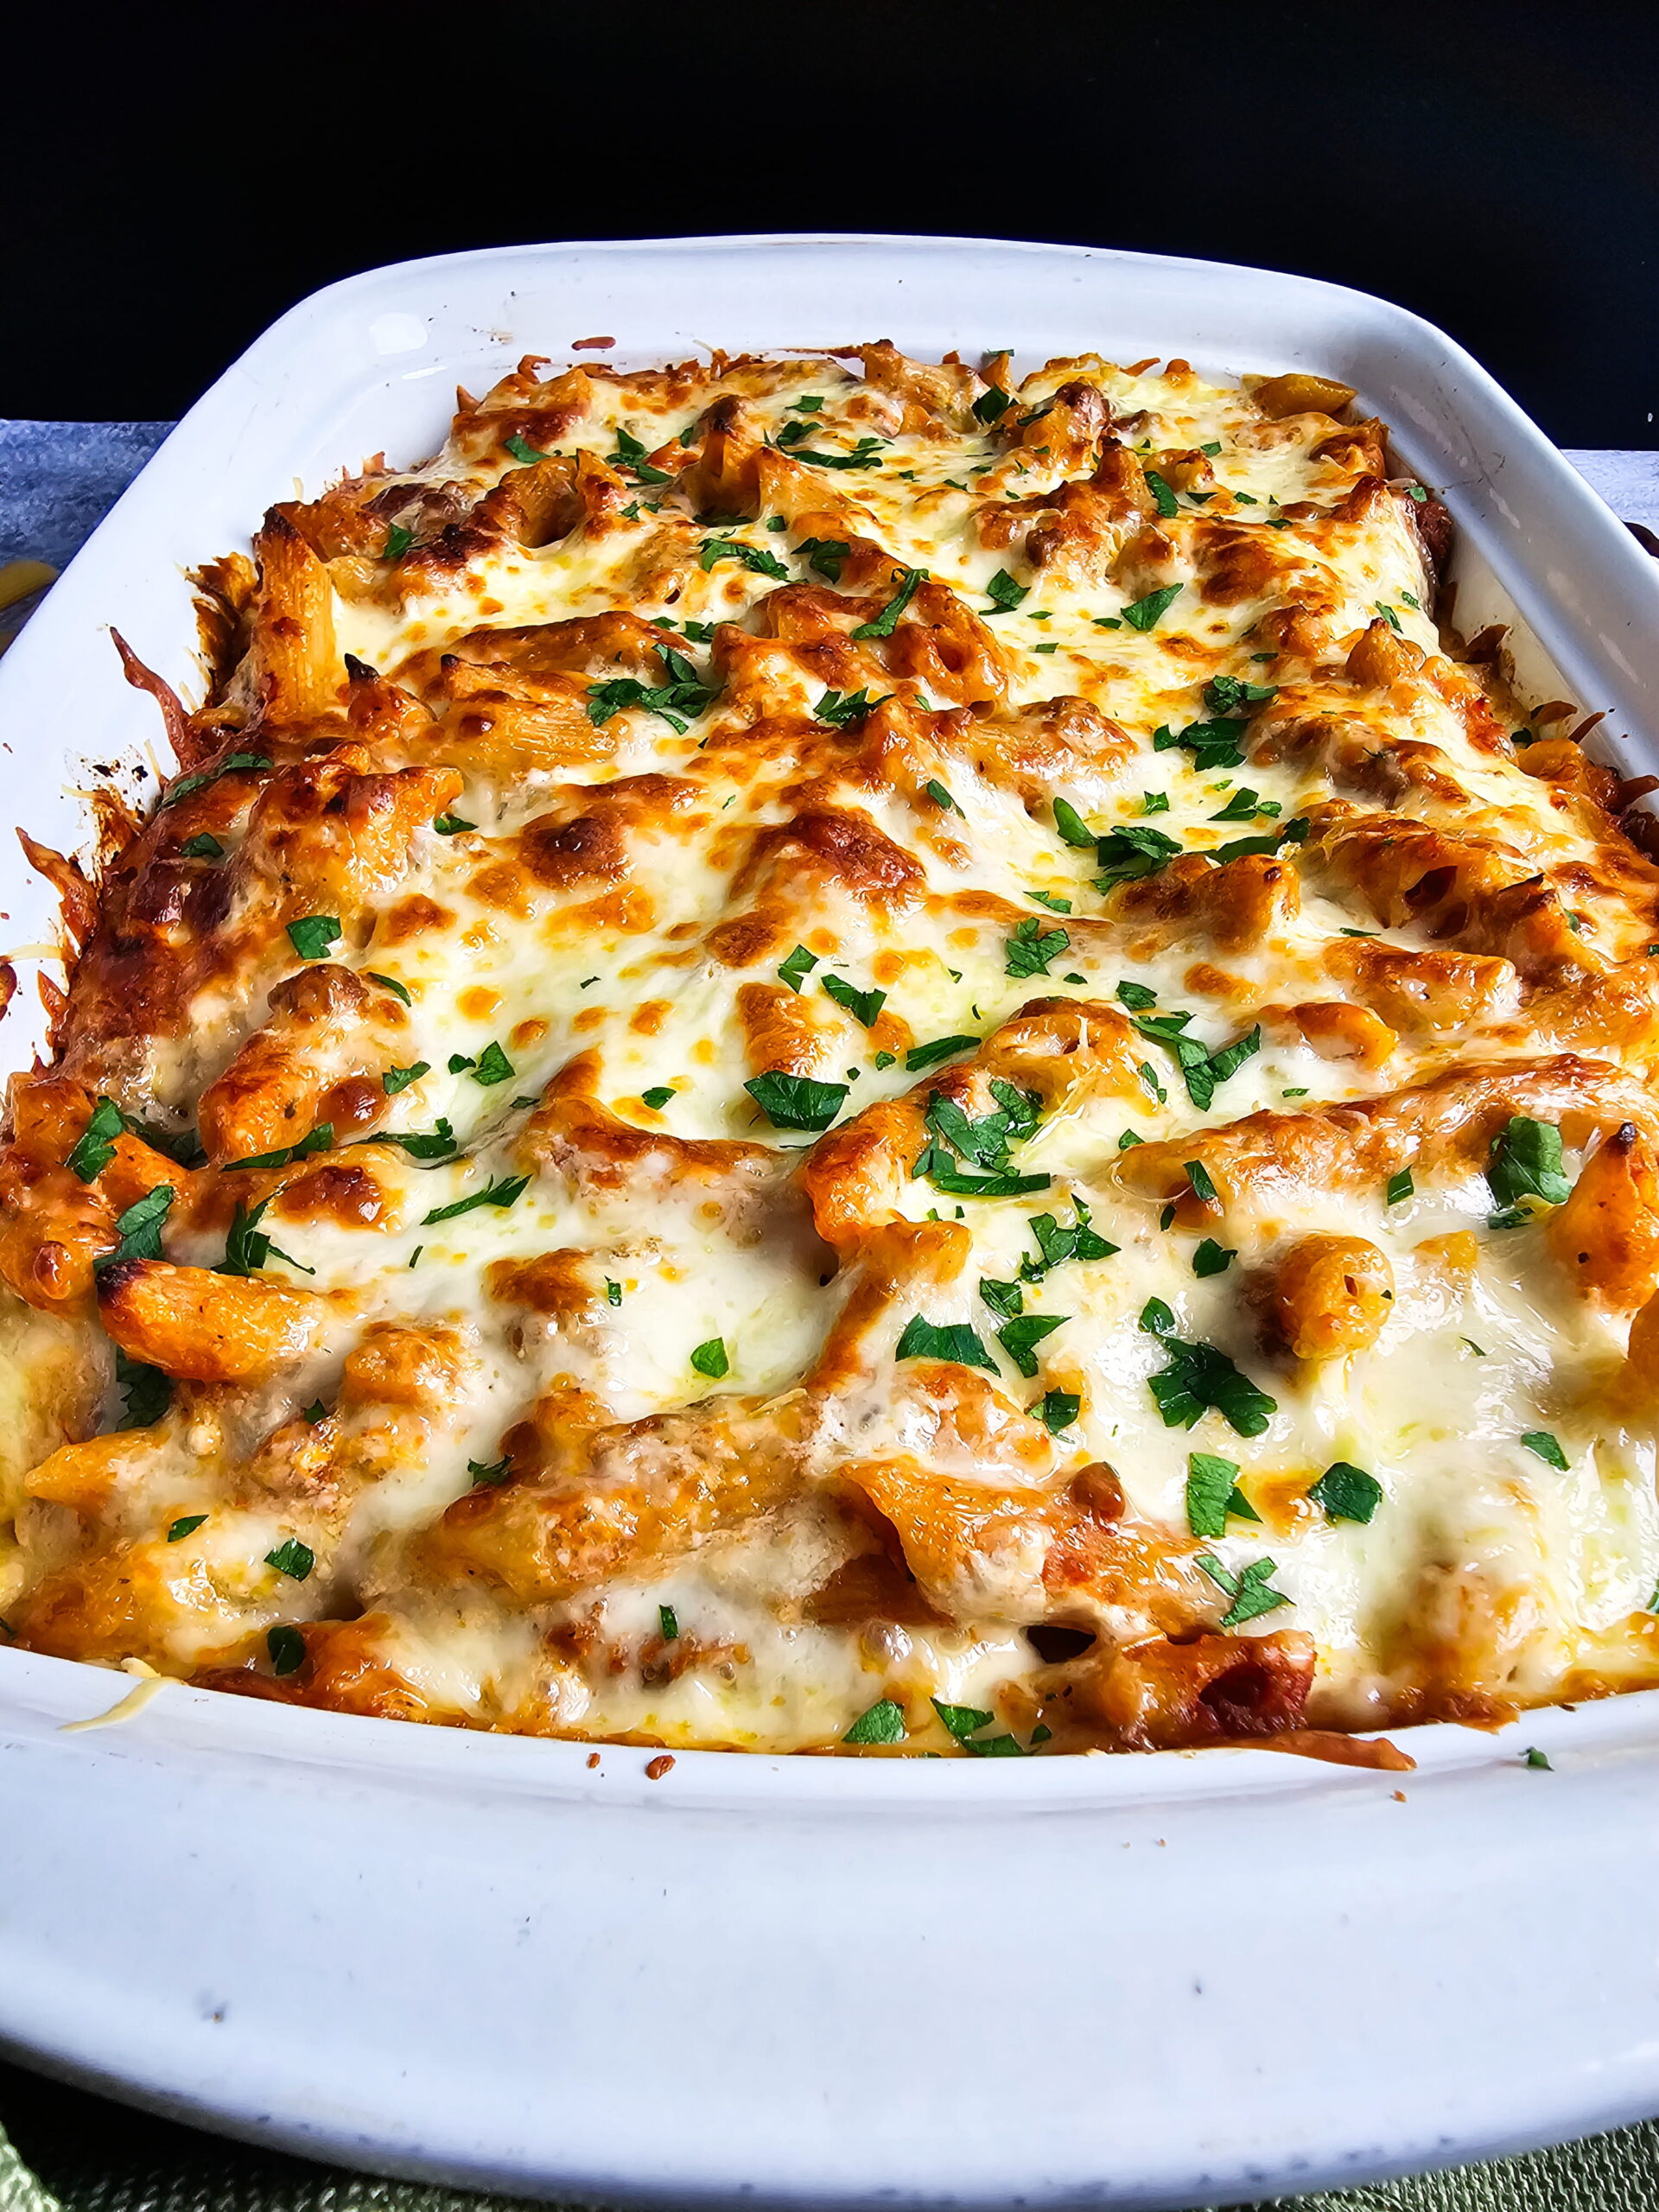
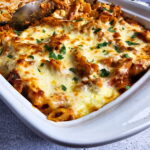
Cover the dish tightly with aluminum foil. Bake covered at 375°F for 20 minutes. Remove the foil and bake for another 10 to 15 minutes. The cheese should be fully melted and the edges should be bubbling.
For a golden crispy top, broil for two to three minutes at the very end. Watch it closely — it burns fast. - Rest Before Cutting (This Is Not Optional)
Remove the baked ziti from the oven. Do not cut into it for at least 10 to 15 minutes.
The layers are still loose and very hot right out of the oven. Resting gives the egg-bound ricotta time to firm up completely. It gives the sauce time to be absorbed slightly by the pasta. And it gives the cheese time to set from molten to sliceable. This step is the difference between a beautiful slice and a messy collapse.

Pro Tips for Baked Ziti with Ricotta That Never Fails
These are the things I wish I had known the first several times I made this recipe. Each one comes from a specific mistake that changed how I approach baked ziti now.
Always use whole milk ricotta:
Whole-milk ricotta has higher fat content and significantly less excess water. Part-skim ricotta is more likely to break down and release liquid during baking. The egg helps regardless, but whole milk ricotta gives you the best result.
Use low-moisture mozzarella, not fresh:
Fresh mozzarella has a lot of water. That water is released into the dish and makes it watery. Low-moisture shredded mozzarella melts beautifully and stays where you put it.
Drain the ground beef after browning:
Excess fat in the pan makes the sauce greasy and loose. Tip the pan and spoon out any pooled fat before adding the tomato paste.
Use a good-quality jarred marinara:
Not all jarred sauces are equal. A thinner sauce stays thin in the oven. The Consumer Reports pasta sauce ratings can help you pick one worth using. Rao’s Homemade consistently ranks at the top for flavor and thickness — it is worth the extra cost for a baked dish like this, where the sauce is a main component.
Do not skip the tomato paste step:
Every recipe has tomato paste in the ingredient list. Almost no recipe tells you to cook it first. Two minutes in the pan transforms it from raw and flat to deep and savory.
Season every single layer:
Salt the pasta water heavily — it should taste like the sea. Season the meat sauce before assembling. Add salt and pepper to the ricotta mixture. Under-seasoned layers make the whole dish taste flat no matter how good the cheese is.
Common Mistakes That Cause Watery Baked Ziti
The pasta was fully cooked before it went in. Fully cooked pasta has no capacity to absorb liquid. It just sits in the sauce and releases starch, making everything wetter. Always undercook by one to two minutes.
The ricotta had no egg. This is the number one cause of watery baked ziti. No egg means no binder, which means the moisture in the ricotta has nowhere to go but into the dish.
The sauce was too thin before assembling. A thin sauce stays thin in the oven. Simmer it for at least 10 minutes before assembling so it thickens slightly.
The dish was not rested before serving. Even perfectly made baked ziti will look watery if you cut it immediately. Give it the full 15 minutes every time.
The mozzarella was fresh instead of low-moisture. Fresh mozzarella releases water as it melts. Use low-moisture shredded mozzarella for topping baked pasta dishes.
Substitutions and Variations
Can I use cottage cheese instead of ricotta?
Yes — drain it first through a fine mesh strainer for 15 minutes. Press out as much liquid as possible before mixing. Still add the egg and sour cream as directed.
Can I use Italian sausage instead of ground beef?
Absolutely. Italian sausage adds more flavor and spice to the sauce. Remove it from the casings and brown it the same way as the beef.
Can I make baked ziti without meat?
Yes. Skip the beef and sauté the onion, garlic, and tomato paste in olive oil. Add diced mushrooms or zucchini for extra substance. Everything else stays the same.
Can I substitute the sour cream?
Yes — replace it with an equal amount of whole milk ricotta. The mixture will be slightly less creamy but still much better than ricotta alone. Greek yogurt also works in a pinch.
Is there a gluten-free version?
Swap the ziti for your favorite gluten-free short pasta. Choose a brand that holds up to oven baking — some gluten-free pastas get very soft. Everything else in the recipe is naturally gluten-free.
Can I use penne or rigatoni instead of ziti?
Yes. Any short tubular pasta works perfectly here. Rigatoni actually holds up slightly better in the oven than ziti for some people.
What to Serve with Baked Ziti
Baked ziti with ricotta is a complete meal on its own. These sides make it even better.
Garlic bread is the obvious choice for a reason. You need something to catch the extra sauce on the plate.
A Caesar salad balances the richness of the cheese and pasta beautifully. The acidity cuts through the heaviness of the dish.
A simple green salad with red wine vinaigrette also works perfectly alongside this.
Roasted vegetables like broccoli or Brussels sprouts round out the meal without competing with the flavors in the ziti.
Make Ahead, Storage, and Freezing
Can I make baked ziti ahead of time?
Yes — this is one of the best make-ahead casseroles there is. Assemble the whole dish up to 24 hours ahead. Cover tightly with foil and refrigerate. When ready to bake, add 10 to 15 extra minutes to the covered baking time. The dish is starting cold so it needs more time to heat through.
How long do leftovers last?
Store leftovers covered in the refrigerator for up to four days. The flavor is often even better on day two.
Best way to reheat?
Add a small splash of water or extra marinara sauce over the top before reheating. Cover with foil and reheat at 350°F for 20 minutes. This prevents the top from drying out. Single portions reheat well in the microwave — cover loosely and heat in 90-second bursts.
Can I freeze baked ziti with ricotta?
Yes — before or after baking. To freeze before baking, assemble completely and cover tightly with two layers of foil. Freeze for up to three months. Thaw overnight in the refrigerator before baking. Add 15 to 20 extra minutes to the covered baking time. To freeze after baking, portion into airtight containers and freeze for up to two months.
Frequently Asked Questions
The most common cause is ricotta without an egg. Plain ricotta releases moisture as it heats and has nothing to bind it. Adding one egg to the ricotta mixture fixes this completely. A thin sauce before assembly and fresh mozzarella on top also contribute to wateriness. This recipe addresses all three causes.
It needs more resting time after baking. Give it a full 15 minutes before cutting. The egg in the ricotta also helps it hold structure while it rests. If the dish is still sliding apart after resting, the ricotta likely had no egg.
The edges should be visibly bubbling. The cheese on top should be fully melted and beginning to brown. A thermometer inserted into the center should read at least 165°F.
Yes — as long as you heat it all the way through. The USDA recommends reheating all casseroles to an internal temperature of 165°F before eating. Use a food thermometer inserted into the center of the dish to confirm. This applies whether you are reheating from frozen or from the refrigerator.
Good jarred marinara works perfectly here. The tomato paste step is what upgrades jarred sauce into something that tastes homemade. Do not skip the tomato paste even when using a jar.
No — the amount used is subtle. You will not taste sour cream specifically. It just adds creaminess and helps the ricotta mixture hold together better.
Yes easily. Use two 9×13 pans or one large roasting pan. Everything scales directly. Bake both pans on separate oven racks and rotate halfway through.
Remove the foil for the last 10 to 15 minutes of baking. For an even deeper color, broil for two to three minutes right at the end. Watch it constantly during broiling — it goes from golden to burnt very quickly.
Looking for more pasta recipes? Try these!
Creamy Chicken Fettuccine Pasta – 30 Minute Meal
The chicken fettuccine pasta is a creamy dinner for busy nights. Tender chicken and rich creamy sauce make this pasta recipe comforting and filling.
Simple Creamy Garlic Parmesan Chicken Pasta
This creamy garlic parmesan chicken pasta is packed with rich flavor in every bite. It is an easy pasta dinner recipe that comes together quickly for weeknight meals.
Bacon Chicken Mushroom Pasta in Creamy Parmesan Sauce
Creamy bacon chicken mushroom pasta is loaded with savory bacon, tender chicken, and mushrooms in a creamy parmesan sauce. It is a hearty pasta dinner recipe that tastes like comfort food at home.
This lemon garlic shrimp pasta is light, fresh, and full of bright citrus flavor. Juicy shrimp and tender pasta make this an easy seafood dinner that everyone will enjoy.
Final Thoughts
Baked ziti with ricotta that holds together is not hard to make. It just requires knowing the four things that cause failure. Ricotta without an egg. Fully cooked pasta. Sauce that never developed flavor. Cutting it too soon.
Fix those four things and you will have a baked ziti that looks impressive, slices cleanly, and tastes genuinely restaurant quality. The sour cream addition and the tomato paste step are the two details that take it from good to great. Make it once with these techniques and you will never go back to the old way.
Baked Ziti with Ricotta That Holds Together and Never Turns Watery
Equipment
Ingredients
- 1 lb ziti pasta
- Salt (for water)
Meat Sauce
- 1 lb ground beef (80/20)
- ½ onion (finely diced)
- 2 cloves garlic (minced)
- 1 tablespoon olive oil
- 2 tablespoons tomato paste
- 1 24 oz jar marinara sauce
- ½ teaspoon sugar
- 1 teaspoon Italian seasoning (or oregano)
- salt and black ground pepper (to taste)
Ricotta Layer (fixed so it sets, not runny)
- 1 cup ricotta cheese
- ½ cup sour cream
- 1 egg
- ½ cup Parmesan cheese (finely grated)
- salt and black ground pepper (to taste)
Cheese Topping
- 2 cups mozzarella cheese (divided) (shredded)
- ½ cup Parmesan (optional: for the top)
- basil (fresh)(chopped)
Instructions
- Cook the Pasta Just Under Al Dente: Bring a large pot of well-salted water to a boil. Cook the ziti one to two minutes less than the package directions. It should be slightly firm when you bite it — not fully cooked. Drain it and set it aside. This step prevents mushy pasta. The ziti will absorb sauce and finish cooking in the oven. If it is already fully cooked going in, it has nowhere to go but soft.
- Build a Proper Meat Sauce (This Is Where Flavor Happens): Heat olive oil in a large skillet over medium-high heat. Add the ground beef and diced onion together. Cook until the beef is browned, and the onion is soft — about 8 minutes. Do not stir it constantly. Let it sit and develop color on the bottom. That caramelization is a flavor you cannot add later. Add the minced garlic and cook for 30 seconds. Now add the tomato paste directly to the pan. Stir it into the beef mixture and cook for one to two full minutes. It will darken slightly and smell incredible. This is called blooming — it removes the raw tinny taste completely. It makes jarred sauce taste like it had simmered for hours. Add the marinara sauce, sugar, and Italian seasoning. Stir together and simmer for 10 minutes. Taste and season with salt and pepper.
- Make the Ricotta Mixture That Actually Sets: In a medium bowl combine the whole milk ricotta, sour cream, egg, and Parmesan. Add a pinch of salt and pepper. Mix until completely smooth. The egg is the most critical ingredient here.It binds the ricotta proteins as they heat in the oven. Without it, the ricotta releases water and turns the whole dish soupy. The sour cream adds creaminess without adding loose liquid. Together they bake into a layer that slices cleanly every time. Do not use part-skim ricotta here. Part-skim has more water content and will release more liquid during baking. Whole milk ricotta has the fat content needed to stay rich and set properly.
- Layer It Properly (Do Not Mix Everything Together): Preheat your oven to 375°F. Spread a thin layer of meat sauce across the bottom of a 9×13 baking dish. This prevents the bottom layer of pasta from sticking and drying out. Add half the cooked pasta in an even layer. Dollop half the ricotta mixture over the pasta. Spread it gently — do not press hard or it will mix into the pasta. Spoon half the remaining meat sauce evenly over the ricotta. Sprinkle one cup of shredded mozzarella over the sauce. Now repeat the layers. Add the remaining pasta, then the remaining ricotta mixture. Spoon the remaining sauce on top. Finish with the second cup of mozzarella. Add a generous sprinkle of Parmesan if using. The layering method matters. Mixing everything together creates a uniform casserole with no texture. Distinct layers give you ricotta in every bite, sauce in every bite, and cheese in every bite.
- Bake It: Cover the dish tightly with aluminum foil. Bake covered at 375°F for 20 minutes. Remove the foil and bake for another 10 to 15 minutes. The cheese should be fully melted, and the edges should be bubbling. For a golden crispy top, broil for two to three minutes at the very end. Watch it closely — it burns fast.
- Rest Before Cutting (This Is Not Optional): Remove the baked ziti from the oven. Do not cut into it for at least 10 to 15 minutes. The layers are still loose and very hot right out of the oven. Resting gives the egg-bound ricotta time to firm up completely. It gives the sauce time to be absorbed slightly by the pasta. And it gives the cheese time to set from molten to sliceable. This step is the difference between a beautiful slice and a messy collapse.