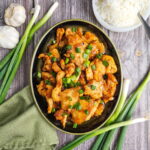
Easy Mongolian Chicken Recipe Better Than Takeout (Crispy + Balanced Sauce)
This easy Mongolian chicken recipe delivers crispy, tender chicken coated in a thick, glossy sauce that beats takeout every single time. The velveting technique keeps the chicken juicy while a balanced sauce built with hoisin, rice vinegar, and chicken broth adds the depth that most homemade versions miss. Ready in 30 minutes and better than anything you can order.
Servings: 4 servings
Calories: 447kcal
Equipment
Ingredients
- 1¼ pounds boneless skinless chicken breast, thinly sliced
- ¼ cup cornstarch
- 1 tablespoon soy sauce
- 1 tablespoon vegetable oil
- Salt and pepper (keep in mind the sauce has plenty of salt)
Sauce
- ½ cup low sodium soy sauce
- ⅓ cup dark brown sugar reduced for balance
- ⅓ cup chicken broth instead of water for depth
- 2 teaspoons rice vinegar key for cutting sweetness
- 1 tablespoon hoisin sauce adds rich takeout flavor
- 1 teaspoon sesame oil (toasted)
Aromatics
- 1½ teaspoons garlic minced
- 1 teaspoon ginger minced, fresh
- ½ teaspoon red pepper flakes optional but recommended
For Cooking
- 3 tablespoons vegetable oil
Finish
- ½ cup green onions cut into 1-inch pieces
- Optional: sesame seeds
Instructions
- Velvet the Chicken: In a bowl, combine the sliced chicken with cornstarch, 1 tablespoon soy sauce, 1 tablespoon oil, and a pinch of salt and pepper. Toss until everything is evenly coated and let it sit for 10 to 15 minutes at room temperature.
- Do not skip this step. The cornstarch gives the chicken its coating and helps the sauce cling later. The soy and oil start building flavor from the inside out. The resting time lets the coating adhere and the muscle fibers relax slightly, which is what gives you juicy chicken instead of dry chicken. This is the same technique Chinese restaurant kitchens use, and it works.
- Make the Sauce: In a small bowl or measuring cup, whisk together the low sodium soy sauce, dark brown sugar, chicken broth, rice vinegar, hoisin sauce, and sesame oil until the sugar is dissolved and everything is combined. Set it aside. Having the sauce ready before you start cooking is important because once the pan gets hot, things move fast.
- The dark brown sugar instead of light brown sugar gives the sauce a deeper, more molasses-forward sweetness that reads as more complex and less candy-like. The rice vinegar amount is adjustable — start with one teaspoon and taste it after the sauce simmers if you want to add more.
- Sear the Chicken: Heat 3 tablespoons of vegetable oil in a large skillet or wok over medium-high heat until the oil is shimmering. Add the chicken in a single layer, working in batches if needed. This is where most people make a critical mistake — overcrowding the pan drops the temperature and causes the chicken to steam instead of sear. You want space between the pieces.
- Let the chicken cook undisturbed for about 2 to 3 minutes until the bottom is golden and crispy. Flip and cook another 2 to 3 minutes until cooked through. Remove the chicken and set it on a plate. Do not cover it or the crust will steam off.
- Build the Aromatic Base: Reduce the heat slightly. In the same pan, add the minced garlic, ginger, and red pepper flakes. Cook for 30 to 45 seconds, stirring constantly. You want them fragrant and just starting to color — not brown and bitter. The rendered chicken drippings left in the pan add flavor here that you would lose if you started fresh.
- Add the Sauce and Simmer: Pour in the prepared sauce and bring it to a simmer over medium heat. Let it cook for 2 to 3 minutes, stirring occasionally. The sauce will begin to thicken and reduce. You will notice it start to look glossy rather than thin and watery — that is the signal you want. Unlike the original recipe, this version does not require a cornstarch slurry because the velveting coating on the chicken provides enough starch to help thicken the sauce naturally as the chicken is added back in. If your sauce is thinner than you like after the chicken goes back in, let it cook an extra minute or two before serving.
- Add the Chicken and Finish the Sauce: Return the seared chicken to the pan and toss to coat everything evenly. Cook for 2 to 3 more minutes, stirring occasionally, until the sauce is thick, sticky, and clings to every piece. This is the moment the dish becomes what it is supposed to be — not chicken with sauce poured over it, but chicken that has become part of the sauce.
- Finish and Serve: Stir in the green onions and cook for one minute. The green onions should retain some crunch — they are not meant to wilt completely. Taste and adjust seasoning. If it needs more brightness, add a small splash more rice vinegar. If it needs more heat, add a pinch more red pepper flakes.
- Scatter sesame seeds over the top if using, and a tiny drizzle of fresh sesame oil right before serving will make the whole dish smell incredible. Serve immediately over steamed white rice, jasmine rice, or noodles.
Nutrition
Calories: 447kcal | Carbohydrates: 31g | Protein: 36g | Fat: 20g | Saturated Fat: 4g | Polyunsaturated Fat: 9g | Monounsaturated Fat: 6g | Trans Fat: 0.1g | Cholesterol: 86mg | Sodium: 1625mg | Potassium: 736mg | Fiber: 1g | Sugar: 20g | Vitamin A: 199IU | Vitamin C: 3mg | Calcium: 50mg | Iron: 2mg